Considering how to hem the ceiling on wooden beams, many owners prefer sheets of plywood. The material is durable, and if you need to clad ceilings in humid rooms, moisture-proof plywood is chosen - it costs a little more, but it tolerates significant differences in humidity. Before work, a frame is formed on which plywood sheets are fixed.
Pros and cons of plywood ceilings
Plywood is made of several thin layers of wood glued together taking into account the mutually perpendicular arrangement of the fibers. Due to this, the material gains strength, becomes resistant to deformation and less susceptible to linear expansion and contraction with changes in temperature and humidity in the room.

Finishing the ceiling with plywood offers the following benefits:
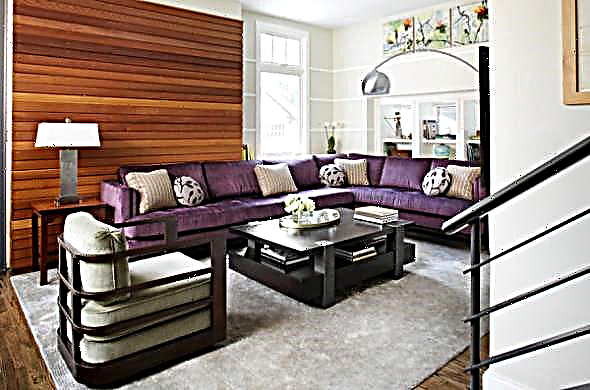
- Just look at the photos of plywood ceilings in a wooden house to understand that such surfaces look beautiful even without a finish and are in good harmony with the wooden wall lining.
- The material additionally protects the room from the cold and improves its sound insulation.
- Thanks to its mechanical strength, the plywood base is suitable for any finish. It can be plastered, stained, pasted with wallpaper and even tiled.
- There are plywood of various grades and classes on sale. For the ceiling in the house, you can purchase both budget and elite varieties of material, as well as use moisture-proof plywood for rooms with high humidity.
- Ecological purity and natural origin of the material make it harmless to humans.
- The light weight of one sheet facilitates its installation, which you can do it yourself.
- Simplicity of processing is also an advantage of the material.
- Impressive durability, resistance to deformation and non-cracking are additional benefits of plywood.
Important! The ecological cleanliness of plywood directly depends on the adhesive mixture used for gluing veneer layers. Casein glue is considered the most harmless, and bequelite plywood can not boast of environmental friendliness.
Despite the many advantages, the plywood ceiling in a wooden house has some disadvantages:
- it is important to properly equip the floor cake and install all the necessary layers so that the surface does not deform due to condensation,
- it is a fire hazardous material, therefore it can not be used in all rooms or impregnated with flame retardants,
- in a room with high humidity, the plywood base must not be left without finishing.
Some owners of country houses believe that plywood ceilings in a wooden house are not attractive. However, much in this matter depends on the type and class of plywood used. If you used elite varieties of material from expensive wood, the ceiling can boast of beauty.
What is this stuff
Plywood consists of many layers of veneer glued together. The core consists of wood, and the outside is glued with veneer. Depending on the type of wood used, the front surface may have a different pattern.
The thickness of the parts depends on how many layers are provided in it. At a minimum, there are three, but there are more multi-layer and thicker versions of the products.
Thickness and layering are not the only characteristics of the sheets. They may have special treatment. This results in a water-resistant variety that withstands the effects of water.

Sheet sizes reach 3600 millimeters in length and 1500 millimeters in width. There are square varieties of sheets that have dimensions from 1220 millimeters by 1220 millimeters, to 1525 by 1525.

The surface can be either smoothly sanded or without similar processing. Coarser, unpolished variety, for decorative finishing of housing is not suitable. There are types of sheets that are sanded on one side only. They can be used for decoration, since the inner side will still not be visible.
The main tree used to make plywood will be birch and conifers. Both are suitable for decoration, but birch will be more durable. Coniferous varieties allow the use of products in wetter rooms, as they are not afraid of dampness and are poorly susceptible to decay.
All types of such products have special marking that defines the properties and purpose. Products with the following designations are suitable for decoration:
- FC - moisture resistant, suitable for internal use
- FKM is also a moisture resistant type, but it should be used more carefully, since the impregnation contains melamine resins
- FOF - “furniture” products with a special coating
Tool List
To minimize the time required to install the ceiling from plywood, you should have at hand all the necessary tools, which includes:
- Roulette, at least 5 m long.
- Building level. Enough length of 1 m.
- Hammer drill.
- Screwdriver. Significantly saves time, especially with large areas.
- Jigsaw.
- An ordinary pencil or black marker. For marking the surface.
If necessary, the punch can be replaced with an ordinary drill if the ceiling surface in the room is made of soft material, for example, foam concrete. Now used and a combined version - a perforated drill.
An electric jigsaw is also optional, just a simple hacksaw for wood is enough. But the process of installing plywood will be delayed.
Material Selection Criteria
In order for the plywood ceiling to serve for a long time, you need to choose a high-quality and reliable material. All finishing plates are produced in accordance with GOST 39616. 1-96. According to the document, plywood ready for work should be made in the form of a rectangle or square. Furthermore, the minimum size of the plate is 1220x1220 mm, and the maximum is 3600x1500 mm. For a square-shaped sheet, the side length should not exceed 1525 mm. The most common sizes most often used in decoration are 2440x1220 mm and 1525x725 mm.

The thickness of the plates is chosen depending on the finished ceiling structure. The thinner the sheet, the more malleable it is at work. The optimum thickness of plywood on the ceiling is 4-5 mm.
Also, when choosing a material, it is necessary to take into account its class, which is affected by the degree of moisture resistance of the coating:
- FC (limited moisture resistance). Such plywood is allowed to be used for indoor decoration. Wood veneer is glued with urea-formaldehyde resin,
- FSF (medium moisture resistance). More moisture-resistant material, for the bonding of which phenol-formaldehyde resin is used, therefore, ceilings finished with such materials have a long service life. Some regions, due to their climatic features, use materials of the FSF class even in exterior decoration,
- FB The advantages of this type over others are that bakelite varnish is used for gluing veneers. As a result, ceilings finished with such plywood will last a very long time,
- FOF (increased moisture resistance). This class is practically not used in interior decoration. Its main purpose is the production of furniture and interior items. Special varnish coating significantly increases the resistance of the material to moisture.
All of the above abbreviations are indicated in the corners of the plates in the form of a seal (usually blue).

For the production of sheets using different tree species. The most common option is birch plywood. Such boards are distinguished by high strength, aesthetic appearance, beautiful structure of natural wood. Coniferous sheets are resistant to mold and fungus, but they release tar when exposed to high temperatures. But they can be safely used for finishing wet rooms.

Plywood is polished on one side (Ш1) or on both sides (Ш2), as well as unpolished (НШ). All options differ in cost. For ceiling decoration, it is better to choose sheets polished on one side. In this case, the unpolished surface of the material will be fixed to the ceiling, and smooth - inside the room.

Depending on the state of the outer layer, the plywood sheets are divided by grade. The variety is affected by the number of permissible defects on the surface of the plate, methods of processing sheets. So, for the first grade of plywood, the maximum number of flaws cannot exceed three, the second - six, the third - nine. The fourth grade plywood belongs to the category of low-quality materials. Two numbers are used to determine the variety. For example, I / I (on one side of the sheet - first-class plywood), II / III (on the one hand - plywood of the second grade, on the other - of the third, etc.).
Important parameters of plywood for the ceiling: thickness
It is recommended to buy material with a thickness of 3 to 6 millimeters. Do-it-yourself fixing a thicker version is not recommended. Firstly, it will not contribute to improving the performance of the product, and secondly, it will only make the ceiling heavier. As a rule, the result of installing too thick finishing plywood is a quick re-repair.

In order to correctly determine the required thickness, it is worth starting from the method of fastening the material. If we are talking about installing on a frame, then in this case a 3 mm version is suitable.
It can then be optionally hemmed, based on the architectural and stylistic features of the room:
- Degree of illumination
- Room Area
- The presence of specific architectural elements,
- Misc.
In the case when installation is done on the crate, it is better to choose plywood with a maximum thickness of 6 mm.
Pros and Cons of Plywood
A wood-laminated plate or plywood is made by gluing layers of natural veneer. They are imposed perpendicular to each other and thus increase the strength of the finished product.
It is widely used in the construction industry, most often for finishing work, for example, to make plywood ceilings with your own hands. The pattern on its surface is the most diverse, it depends on the tree species from which it is made.

There are several advantages to using plywood as a finish:
- environmental friendliness
- strength,
- affordable price,
- the ability to personally cover the ceiling with plywood,
- relatively light weight sheet of material,
- good sound and thermal insulation performance.
Due to the presence of numerous advantages, plywood has become a popular product in the construction market. It should not be forgotten that this is a combustible material, so it should be used with caution.
For ceiling plywood in the bathroom and in the kitchen, you cannot use ordinary plates that do not have a polymer layer, since their surface can be deformed under the influence of moisture. After completing the installation of this material, he needs to finish.
Features
Before deciding on the design, you should study the features of the material, find the best option for design, figure out what constitutes a ceiling hem.
Plywood is made from thin sheets of veneer that are glued together. The pattern on the surface of the material depends on the type of wood. In the manufacture of plywood, conifers and birch are more often used.
Birch plywood will delight you with a variety of color shades, which will make the ceiling externally attractive. Such products are highly durable.
For use in rooms with high humidity, it is better to purchase plywood from coniferous trees; fungus, mold and rot will not appear on it.


Plywood varies in thickness, this parameter depends on the number of layers that were used. The minimum number of such layers is three; there are also more multilayer options.
When self-finishing ceilings, prefer thin sheets, they will not burden the design, are convenient for work. Material from 3 to 6 mm thick is suitable for the ceiling, thick options on your own will be much more difficult to fix. When installing plywood on the frame, choose a product with a thickness of 3 mm.


When choosing plywood sheets, you should carefully inspect them, they can be smoothly sanded or unprocessed. Rough and untreated sheets are not suitable for decoration. You can choose the option where the surface is polished on one side only. Such plywood is quite suitable for interior decoration, since the inner side will not be visible.
Plywood is a combustible material, therefore, the use of such surfaces should be approached with caution.
Plates that do not have a polymer layer are not used for decoration of some rooms, they are deformed at high humidity.


When choosing products, pay attention to the marking:
- FC - the product is moisture resistant, can be used indoors.
- FCM - moisture resistant product, but contains melamine resin, used with caution.
- Fof - such marking means that the material has a special coating, can be used for the manufacture of furniture.
The advantages of plywood include the following properties:
- mechanical strength
- good heat and sound insulation,
- possibility of use in rooms with high humidity,
- high decorativeness
- light weight, which will reduce the load on the ceiling,
- environmental safety.
The coating is made of natural materials, which is an undoubted advantage.
Sheets of plywood can be used in residential premises, they are not harmful to children, the elderly, animals.


Fiberboard on the ceiling in a wooden house
To all the disadvantages of plywood, you can also add the large weight of the sheet glued from 6-8 layers of birch veneer. It is quite difficult to physically lay and hold over your head until the installation of the fasteners is complete, especially if you try to finish it alone with your own forces.

Fiberboard - a very light and easy-to-use material
To simplify the work and reduce the load, many craftsmen offer to sheathe the ceiling in a wooden house with fiberboard or wood-fiber board. Pressed cellulose fiber sheets are several times lighter, well cut, polished, and sized.
If you choose the sheet brand or use hardboard, it is quite possible to make a full-fledged ceiling of fiberboard with your own hands, photo.

Fiberboard surface is ideal for painting
Fiberboard Mounting Options
To mount a ceiling from wood-fiber boards, you will need to assemble a crate with higher rigidity and accuracy of the surface. It’s obviously impossible to just sheathe the fiberboard ceiling in a wooden house, laying sheets on the beams of the transverse overlap, stitched with a grating like a plywood. Fiberboard has very little stiffness, so the surface will be wavy.
In order to lay the fiberboard on the ceiling surface, you can use three mounting options:
- Make a special crate or shingles,
- Use a metal frame under the fiberboard, as is the case with drywall,
- Completely sew a draft ceiling from an unedged board or slab.
Any of the above designs of rough binder will make the hardboard finish stiff, and most importantly - flat. The sheets themselves can be fixed with wallpaper studs, you can glue, in extreme cases, use a furniture stapler.
DIY fiberboard ceiling
From practice it is known that the best option for laying wood-fiber boards is rack shingles. Thin strips with a length of not more than 2.5 m are packed on the ceiling beams with a step of 5-10 cm. It turns out more rigid than in the case of plywood, and at the same time a sufficiently strong lattice that can hold a relatively lightweight fiberboard sheet.
It is best to cut wood-fiber boards in advance into strips or blanks with a width of not more than 1.2 m. It is quite possible to hold such fiberboards on the ceiling with your own hands, in order to pre-grab it along the sidewalls, and then it could be straightened, aligned and sewn to the slats on the ceiling.
Advice! If the fiberboard is glued to the crate, then a plywood sheet can be used as a support, with which the material is pressed to the rails and fixed with several vertical supports.

It is easy to glue duct and lining from fiberboard
Seams and joints are sealed with a mixture of wood glue and cellulose fiber obtained by dissolving fiberboard or plywood scraps on an emery wheel. So that the putty does not fall out of the seams, it is sealed with tape.
Expert Advice
In order to please you and serve the plywood ceiling as long as possible, during the installation process, follow the following recommendations of the masters:
- Large plywood sheets are not enough to fix only around the perimeter, because they will sag in the central part. Provide intermediate rails of the frame so that the plate can be screwed with screws in the central part.
- Be sure to leave 2-3 mm gaps between adjacent sheets and around the perimeter of the room from the walls. Otherwise, when the humidity or temperature in the room changes, the surface may swell and deform. To hide these gaps, you can use wooden battens, putty and ceiling skirtings.
- Smaller plates are easier to fix alone, so large sheets are recommended to be cut into pieces. It is important to consider the step of the battens. The joint of all sheets should fall exactly in the middle of the rail.
- For the manufacture of a supporting frame, it is better to use strips with a width of at least 5 cm. Otherwise, it will be difficult to fix the two edges of the joined sheets on the same rail. If you screw the screws close to the edge, the sheet may crack or crack.
After filling the joints, the surfaces are allowed to dry. Then these places are polished and cleaned of dust. Next, the plywood ceiling is treated with a primer and dried. After that, the base is ready for finishing.
Hardwood ceiling
For wooden houses, a special material based on fiberboards - hardboard is best suited. In fact, this is the same fiberboard, but with a laminated surface on one side. It can be just a smooth surface, or a glued PVC film with a pattern and texture of stone, wood or even imitation tiles.

The principle of laying hardboard is no different from decorating the ceiling using fiberboard. The only significant difference is that most customers perceive the fiberboard as a rough basis, and prefer to sheathe the fiberboard ceiling in a wooden house only as a preparation for further decoration, for example, wallpapering or film gluing.

How to make?
Before starting work on decorating the ceilings with their own hands, they carry out the preparatory stage:
- The concrete ceiling is cleaned of the previous coating, the cracks are closed using a mixture of cement and sand.
- From the sanded coating remove the remnants of dirt and dust, primed.
If the ceiling is stitched with plywood, then preparatory work is not carried out, sometimes an antiseptic is applied to the coating. In order to file plywood ceilings, you can use several options.


One of the simplest and fastest methods is fixing to the surface with glue. Installation on glue will allow to keep the height of the room. With your own hands, you can sheathe ceilings in small rooms, where there are no temperature differences. This method takes a little time, you just need to apply glue and press the material to the surface.


If space should be left between the ceiling and the plywood surface, they are mounted on corners.
With this installation, finishing is carried out in a certain order:
- Mark up.
- The necessary distance backs away from the corner and outlines the points for installing the fasteners.
- Using a screwdriver and self-tapping screws, angles are installed on the wall.
- A sheet of plywood is laid on the corners and pressed against the wall.
- The last sheet is cut with a jigsaw.


If the plywood sheets will perform a decorative function, then perform installation on suspensions. For the crate, an aluminum profile or wooden beams are used. They calculate how plywood sheets will be placed on the ceiling, their edges should be attached to the crate, which eliminates sagging and peeling of the material.
Plywood sheets should be fastened from the center of the room, fragments that have already been trimmed will be screwed at the edges.
The crate is fixed in this way:
- The frame is fastened to the concrete ceiling by quick installation.
- On the wooden ceiling, the crate is fixed with screws longer than 40 mm.
- The finished crate looks in the form of bars, which are arranged in rows in parallel on the ceiling.
For smooth and prepared surfaces use mastic. When sheathing using mastic, the height of the walls does not decrease, while the work itself does not take much time.


Operating procedure:
- Mark up on the surface.
- On the reverse side of the plywood, epoxy glue is applied, sprinkled with sand on top to ensure reliable fastening.
- After drying, the mixture is applied mastic. For work using a figured spatula.
- The plywood sheet is attached to the surface.
This is a rough step. After the installation is finished, they finish to hide the joints, remove minor defects, cracks, close the indents from the wall, etc.


The ceiling of a wooden house can be finished in various ways and materials:
- treat with stain and varnish,
- paint,
- use stencils for decoration,
- wallpapering,
- use structural plaster.


When choosing the first method, they take a roller or brush, put a stain on the plywood and leave to dry. After the plywood has dried, it is necessary to smooth out the roughness, for this, sandpaper or a grinding machine is suitable. Varnish is applied to the prepared surface using a roller, brush or spray.
Water-dispersion paints are best for painting plywood ceilings.. A primer is applied to the surface, after it has dried with putty, the cracks are closed, and bumps and bumps are eliminated. Then you should walk along the seams with sandpaper. The preparatory work is finished, you can paint the surface, it is better to use a roller, and the places near the walls are painted with brushes.


After painting the surface, a screen pattern is applied as desired. To apply a drawing, a stencil should be applied to selected areas and painted over with a different color of paint. Then carefully, so as not to grease the picture, remove the workpiece.
Before gluing wallpaper, you should carefully prepare the surface so that you do not tear them when working. Glue is applied only to the wallpaperworking with non-woven products, they also coat the ceiling. For plywood ceilings, it is better to use liquid wallpaper.
You can finish the ceiling with structural plaster. Apply material with spatulas of different sizes. Putty finishing will definitely not be cheaper, but this option is the most durable.
Covering the ceiling with plywood will make it possible to create an interesting design that will look harmoniously in the room. In addition to plywood, they use OSB during repairs. It is easy to work with such plates, they can be cut, glued and painted with glue and wood paint. OSB can compete with plywood products, the thickness of the sheet allows the use of material for wall sheathing, roof lathing, as the basis for tiles, slate. OSB are attached to the logs, they are intended for flooring of roofing surfaces.


Plywood ceiling design (interior photo)
Acceptable varieties of paints for plywood ceilings
Pharmacy accuracy in this matter is the key to a good result. According to their texture, paints are divided into glossy and matte. The first category includes substances that look good on a perfectly flat surface.
It is not recommended to use them if visually noticeable defects exist. The second category includes substances that can completely hide even significant surface defects.
At the same time, one should not expect significant aesthetic qualities from them. There is another characteristic of chemicals of this kind.

It is based on the type of diluent used:
- Silicate - provide maximum traction.
- Latex - differ in the increased ability to resist water.
- Water emulsion - easy to apply on various surfaces.
- Water soluble - refers to environmentally friendly substances.
- Alkyd - characterized by increased strength. Finishing the surface with their help reduces operating costs and increases the time between repairs.
For rooms where a permanent stay of people is planned, it is recommended to take the water-emulsion option. In the case where the surface of the ceiling has many flaws, then it can be finished with silicone paint. The layer thickness is at least 2-3 mm.
Examples
Many do not believe that it is possible to create a beautiful coating using only this material. To dispel doubts, the photo below shows examples of how plywood ceilings look.


Conclusions
Undoubtedly, plywood can be used not only for rough works. Decorate the room with this material is quite real. And the cost at the same time, not too hit the pocket.
The possibility of independent production of the coating and its subsequent installation only adds points in favor of such a design, but it looks very good.
Paint the plywood ceiling with your own hands: step by step instructions
Specific recommendations depend on the goal. For example, if it is necessary to obtain a uniform color in all respects, then in this case it is better to paint a slightly moistened surface. A completely different procedure is provided when maximum penetration of the substance into the structure of the material is required. It will help in this case, the stain is slightly warmed up. It is best when the first layer is applied strictly along the structural fibers. Once it has dried, a second is applied. To do this, use a hard brush or a regular tampon for staining.

Depending on your needs, you can choose one of the following colors:
Once the painting process is complete, allow the ceiling to dry. The minimum recommended time is 24 hours. Some manufacturers may argue that 35 minutes is quite enough, but it is better not to conduct such dubious experiments. The longer the ceiling dries, the more durable it will be. It is strongly recommended that you do not open the window during the drying process.
Number of blocks: 19 | Total number of characters: 23971
Number of donors used: 7
Information for each donor:
Advantages and disadvantages of plywood for the ceiling
At first glance, the appearance of plywood is not very attractive for decorating ceilings. But this is if raw boards are used. The sheets covered with varnish or stain are radically transformed, so they can adequately decorate any room.
The main advantages of the material include:
- good heat and sound insulation characteristics,
- increased sheet strength
- moisture resistance
- beautiful appearance
- low weight, thanks to which you can make a plywood ceiling yourself,
- smooth surface allows you to finish sheets in different ways,
- environmental friendliness
- budget cost.
Finishing ceilings with plywood in wooden houses can be done using laminated sheets. The surface of such plates is covered with a special film, exactly imitating natural wood.
The plywood ceiling will reliably hide communications, wiring, ventilation systems, as well as heaters located under the base ceiling base.
As for the shortcomings, they are few:
- low fire safety. Fire resistance of plywood can be increased by applying special impregnation,
- relatively short service life.
How to sheathe plywood ceiling: step by step instructions
After you purchase plywood for ceilings, you can proceed directly to the finishing stage. But first, you need to prepare a draft ceiling.
The first step is to level the surface, and a diagram will be drawn up according to which the crate will be located, as well as the plywood ceiling sheathing. If your house has concrete ceilings, you will have to completely clean off the old finish, remove falling plaster fragments, and grout deep cracks and cracks with a mortar based on cement and sand. After this, the ceiling must be sanded, and covered with a primer layer of deep penetration.
As for the ceilings, decorated with wood, then careful preparation for them is not needed. It is enough to treat the surface with an antiseptic compound to protect against insects and bacteria.
To work, you will need a level, tape measure, a simple pencil or marker, a screwdriver, a puncher, scissors or a hacksaw for metal, sheets of plywood and wooden beams for mounting the battens.
Installation of the crate
Finishing the ceiling with plywood begins with the installation of the lathing. You can mount the crate with your own hands without the involvement of specialists. The procedure will be as follows:
- using tape measure we find the center of the ceiling surface,
- using a long straight bar, we mark the ceiling so that on one rail of the crate, two sheets of material can be fixed at the edges,
- as a result, you should get a cellular pattern on the surface of the ceiling space, where the rails located in the transverse and longitudinal directions form squares with sides of 50 cm. Such dimensions will be sufficient to prevent the material from sagging after the ceiling lining,
- the crate is mounted on self-tapping screws or nails with a wooden ceiling base, and on dowels if the base surface is made of concrete. For the crate, glued beams with dimensions of 20x40 or 30x30 mm are used.
Important! Continuously check the evenness of the frame base in a horizontal position with a building level. Vertical drops can be corrected with small pieces of plywood placed under the bars.
You can mount plywood on the ceiling without installing it on the frame. In this case, the installation features are that the plates are fixed to the ceiling on the glue, which is applied with a notched trowel to the sheet, evenly distribute it, and press the plate against the ceiling. With this installation method, it is better to cut the sheet into smaller parts, since the adhesive composition may not support the weight of a whole piece. Use this method of decoration only in small areas, as well as in rooms with low humidity.
Fastening plywood to the crate
First of all, you need to think in advance how plywood sheets will be arranged on the frame. Whole plates should be placed in the central part of the ceiling, and trim - at the edges.
Piling the ceiling with plywood is not a complicated process, to act in which you need to do the following:
- lift the plate, attach it to the frame,
- set the sheet so that its edge falls on the middle of the beam to which it will be attached, align,
- on screws or self-tapping screws with a step of 20-30 cm, attach plywood to the crate,
- do the same with the remaining sheets of plywood, leaving a gap of 2-3 mm between adjacent elements,
- from whole sheets cut pieces of the right size, fasten them around the edges.
When fastening plywood to the crate, step back from the edge of the sheet 1-1.5 cm to avoid splitting of the material.
Seam processing on plywood ceilings
There are several ways to process the seams resulting from the installation of plywood:
- in places of the gaps left (2-3 mm), a thin lath is filled, after which the entire surface of the plywood ceiling is painted. This option is acceptable if it matches the style and direction of the interior in the room,
- seams are putty with wood compounds, then cover the entire ceiling surface with the selected decorative material. For example, glue wallpaper or tile,
- first, the seams are primed, then a putty layer is applied, which after drying is wiped with fine-grained emery paper, the entire plywood ceiling is primed. Then choose the method of finishing - stretch, suspended ceiling, etc.
Plywood ceiling finish
There are several ways to decorate a plywood ceiling in a house or apartment. The most common are:
- varnish and stain. This option is ideal for birch plywood. First, a stain is applied to the ceiling surface with a roller in two layers: the first - along the location of the fibers, the second - across. After the new ceiling dries well, it is treated with a special grinder and varnished,
- paint. Acrylic or aqueous emulsion formulations are best used. Before finishing the ceiling with paint, it must be primed. Color is added to the paint until the desired shade is obtained, then the surface is painted in the usual way,
- stencil. First, the entire ceiling is painted in one tone. Then, using the stencils on the ceiling surface, the desired image is reproduced. It can be geometric shapes, floral arrangements, etc.,
- wallpaper. The technique for wallpapering is similar to decorating a plasterboard false ceiling in this way. The main condition is the quality preparation of the base.
On a note! For plywood, it is best to use liquid wallpaper.
- plaster. When finishing plywood ceilings in this way, it is only necessary to use structural plaster, which is sold ready-to-use. The compositions are applied using narrow and wide spatulas, and after the surface dries, it is rubbed with a building grater with sandpaper. This method of decoration is the most expensive and time-consuming, but it will last longer than the rest.
After the final decoration of the plywood ceiling is carried out, a decorative baseboard is installed around the perimeter, which will hide the gaps between the wall and ceiling surfaces, giving the room a harmonious finish.
Thus, plywood is used not only for rough finishing indoors. If you wish, you can make beautiful plywood ceilings with your own hands, which will please you for a long time.
Mounting options for plywood on the ceiling in a wooden structure
There are different options for installing plywood sheets on the ceiling of a house made of wood. The ceiling cake in a wooden house depends on the purpose of the room.

As a rule, the following layers should be present (from top to bottom):
- Draft or finishing floor of the upper floor or attic.
- Vapor barrier.
- Floor beams.
- Thermal insulation laid between the beams.
- Layer of vapor barrier.
- Crate.
- Draft or finish plywood ceiling.
What is it made of?
Plywood is made mainly of coniferous trees and birch. In this case, the most valuable product is one that is made of birch, as it has increased strength. Varieties made using conifers are used in rooms with high humidity, as they are not afraid of dampness.
To navigate in the types and purposes of the product allows marking, which indicates certain properties of plywood:
FC - moisture-proof plywood, suitable for interior use FCM - also moisture-proof plywood, but with the addition of melamine resins. That is, with its application you need to be careful FOF - a product that has found wide application in the furniture industry. Advantages of finishing from plywood. If you do not see the prospects of this material, then plywood may not seem the most suitable material for decoration. However, if you apply one of the finishing methods - varnish coating or stain application, then unsightly material will turn into a rather interesting interior solution. Over the ceiling from plywood, you can easily hide communications, hide the flaws of the ceilings. In addition, if desired, it is possible to cut holes in it for fixtures.
 The price of the issue will also be a huge plus - such a ceiling will become much cheaper compared to wood panels, and visually the difference will be barely noticeable. Installing a plywood ceiling Installing a plywood ceiling is very simple. The first step is the preparation and installation of the crate, on which plywood sheets are subsequently attached. Then plywood sheets are fastened with ordinary self-tapping screws. As a lathing, wooden or glued bars of 30 * 30 mm are ideal. They are fixed to the ceiling at a distance of about half a meter from each other. If thicker plywood is used, then the distance between the bars can be increased. Important: when installing plywood ceiling in residential premises, it is worth using sheets of a thickness of at least 6 mm. Otherwise, thin sheets will bend. Thick are difficult to install. After the plywood sheets are fixed on the crate, it remains only to install the ceiling plinth.
Choose the right material
Before purchasing sheets of plywood for the ceiling, you should understand its varieties and some features so as not to acquire low quality material.
The main brands of plywood:
- FC. A standard plywood sheet used for decoration. It has increased resistance to moisture. This effect is achieved through the use of carbamide-formaldehyde resin - a special adhesive material.
- FSF. It differs from the previous material not only by a high level of resistance to moisture, but also by the possibility of application in external works. FSF has a long service life even with temperature differences and prolonged exposure to precipitation.
- FB This brand of sheets is usually not used for finishing standard rooms. In the FB, bakelite varnish is used, for which even the harsh conditions of the tropical climate are not afraid. This plywood is often finished with technical rooms.
- FOF. A sheet of plywood, the surface of which is laminated, which makes it more attractive. FOF is not used for decoration, it is a material for the manufacture of furniture.
You should also consider the type of wood from which the plywood ceiling is made. For example, birch not only gives additional strength to such a material, but also a pleasant, soft shade. And plywood from coniferous trees practically does not decay (but also requires processing).
Key Benefits of Using Plywood
Of course, the surface of plywood sheets was never distinguished by a special aesthetics, and was mainly used for finishing technical rooms. The low cost of this material corresponded to an insufficiently long service life. But modern plywood is a type of material that, if properly processed, will last more than one year. At the same time, modern plywood sheets have an attractive appearance for residential premises.
The main advantage of plywood is its ease of manufacture, hence its low cost. In combination with modern varnishes, paints, stains, plywood takes the form of expensive wood. But such a product will cost several times less. You can also apply surface lamination and give the plywood sheet a more aesthetic appearance.
Plywood is easy to install. For example, to install the ceiling, you will need 2 people (one to support the sheets) and the minimum set of tools listed above. Also, for plywood sheets it is not necessary to purchase expensive consumables - ordinary self-tapping screws will be quite enough. To cut holes for fixtures, wiring or additional decorative elements, it is enough to use a jigsaw or hacksaw. With such material, there are much fewer problems than with more fragile drywall.
To all of the above, it should be added that plywood is a natural material, although it has undergone numerous processing. But some types of plywood sheet should not be used, for example, FB. In the production of this plywood, bakelite varnish is used, the evaporation of which adversely affects health.
Stage 1: preparation
A fairly simple but painstaking task that requires some patience. It is necessary to prepare the future plywood ceiling for further installation: clean it from dust and large debris, remove wallpaper, tile or old putty (if any), and treat the surface with an antiseptic. A cheaper, but also reliable material is copper sulfate.
If self-tapping screws will be used as a ceiling mount, then after processing the preparatory stage can be considered completed. But some owners of apartments or private houses prefer to mount the plywood ceiling on glue. Then the ceiling should be not only processed, but also leveled. For leveling, use plaster or putty.

Stage 2: markup
A responsible event on which half the result depends. If the layout is incorrect, the design will turn out to be uneven and it will require removing the entire surface from the plywood and re-assembly. Initially, markup should be done on a piece of paper, and only then transferred to the future plywood ceiling.

It is necessary to choose the correct interval between the elements of the crate, whether it be a beam or a profile. Firstly, the ends of sheets of plywood for the ceiling must be fixed on one bar. To do this, measure the sheet in such a way that its edge is located in the middle of the bar. Then there is a place for fastening elements.
In addition to the main beam or profile for finishing the ceiling, intermediate elements should also be mounted that contribute to reliable fixation of the canvas. The distance between the main rails must be controlled within 0.5 m, and between the additional rails - 0.25 m.
When marking the future ceiling from plywood, you should choose the correct direction of the crate for the ceiling, which should go across the sheets of plywood. The transverse arrangement of the beam or profile will provide greater reliability of the structure.
Stage 3: installation of the crate
For the crate in the room, it is allowed to use 2 varieties of building material:
- Wooden beam for ceiling decoration. Now wood, even of poor quality, is an expensive material, and its use as a technical design is irrelevant.
- Metallic profile. Cheaper material, if installed correctly, the profile structure will be very strong and reliable.
The first step when installing the crate and plywood on the ceiling is to find the bottom point of the entire ceiling. From this point it is necessary to begin the installation of the crate. Throughout the area, longitudinal rails should be fixed, the upper level of which should coincide with the zero point of the ceiling. For a better design, it is necessary to use the building level.

The extreme elements of the crate do not need to be mounted to the ceiling, they can be attached to the walls using the same dowels. The strength of the structure from this will not get worse. To fasten the beam or profile to the plywood ceiling, use dowels (if the surface is concrete), or ordinary screws when mounting on a wooden surface.
After the longitudinal rails, you can begin to install the cross, which are an element of the ceiling decoration, providing additional reliability and strength.
Stage 4: installation of plywood sheets
The final stage of the installation process of the ceiling from plywood sheets in the room. If the crate is made according to all the rules and the level, then fixing the plywood will not take much time. Before the ceiling will be finished with plywood, the material must stand at room temperature for at least two days.
The process is quite simple: one person applies a sheet to the crate, and the second fastens it with self-tapping screws. When using glue, you should wait a while until the composition dries. It should be remembered that when gluing the material you can not use thick sheets of plywood.
How to mount
It is very simple to assemble the ceiling from plywood - you need to prepare a crate on which the sheets will be fixed and attach the sheet coating to it.

For crates, wood or glued bars are suitable, sizes from 30X30 millimeters. They are attached to the ceiling in increments of 50 centimeters. You can take a smaller step in cases where a sufficiently thick plywood is used.
For ceilings in residential premises, it is best to use products no thinner than six millimeters. Thinner can bend. Very thick should not be taken either. They are not only more expensive, but also in installation will be more difficult.
Sheets of material are attached to the assembled and fixed crate, using self-tapping screws. The joint of the ceiling and the wall is decorated with a decorative baseboard.
Tools and Materials
Depending on the installation method of plywood sheets, different materials and tools from the following list may be needed:
- ladder,
- drill,
- screwdriver
- construction and laser level,
- wooden slats or metal profiles for the manufacture of lathing,
- dowels and screws,
- chopping cord
- plywood sheets
- perforated suspensions
- wood glue, if you plan to stick the sheet to the base,
- roulette,
- ruler
- pencil,
- notched trowel,
- wood cutting jigsaw,
- antiseptic impregnation or primer on wood.
Important! Before installing plywood on a wooden floor, a waterproofing film should be installed.
If the house is new and the waterproofing of the floor has not been done before, then the film is attached to the floor beams with a stapler, overlapping the strips by 150 mm and gluing the joints with tape. The material is brought on the walls to a height of 20-30 cm.
Crate mounting
The plywood ceilings in a wooden house are easiest to install on the crate. This method is suitable if the base ceiling surface has defects and is not even. Please note that when installing plywood on the crate, the height of the room will decrease by at least 3-5 cm. The exact value depends on the installed communications, the evenness of the base and the thickness of the crate.

We are installing plywood sheets on the crate in the following order:
- If the base ceiling is uneven, you need to find the lowest angle in the room using the laser level. Then we calculate how much the new ceiling will decrease, and put this value down from the angle found. After this, we transfer the marks to the remaining corners and connect them using a masking cord.
- According to the markings on the walls we fasten the bars of the crate or the metal profile. They are mounted around the perimeter of the entire room.
- Then we attach the longitudinal battens of the battens to the rail on the wall surface in increments of 40-50 cm. If the structure is mounted at a distance from the base ceiling, then we use perforated suspensions to fix the battens to the ceiling.
- Next, check the evenness and horizontality of the frame and proceed with the installation of plywood.
- Sheets begin to mount from one of the corners of the room.The joint of adjacent plates should be in the middle of the battens. We fix the sheets with screws on wood or metal, installing them in increments of 15-20 cm.
- Between adjacent plates we leave a gap of 2-3 mm to compensate for the expansion of the material with a change in temperature and humidity in the room.
- The last in the row of plates are cut in length and width.
Glue laying
If the house has a draft ceiling and it is relatively flat, then plywood sheets can be glued directly to the base. First you need to prepare a basic wooden ceiling. To do this, it is cleaned from the old finish. Then thoroughly putty all the holes, cracks and eliminate significant irregularities. After the solution has dried, the surface is treated with a primer for wood.
Now you can start gluing plywood sheets. The adhesive mixture is applied to the back of the plate with a notched trowel and evenly distributed over the surface. Then we apply the plate to the ceiling and press it well. We hold the sheet for about a minute, so that the adhesive mixture has time to set.
Attention! For gluing plywood, polyurethane glue is suitable for working with wood materials. It quickly sets, does not harm health and is not absorbed into the wood.

The adjacent plates are glued with a gap of 2-3 mm. Also leave a technological gap of 0.5 cm around the perimeter of the room. Subsequently, it will be closed by a skirting board. Before finishing, the seams between the sheets are carefully putty and sanded.
Beam Mounting
Now let's talk about how to hem the plywood ceiling on wooden beams. This method is suitable for new buildings in which the ceiling has not yet been finished. First you need to fix a layer of waterproofing film to the beams. How to do this, we described above. After this, the waterproofing layer is additionally fixed with a 2 cm thick wooden crate. This is necessary so that an air gap remains between the plywood coating and the waterproofing layer. Due to air circulation, condensation will not accumulate here, which will contribute to the appearance of mold and rot, as well as damage to materials.
Next, we fasten plywood sheets to the crate with screws. Fasteners are installed in increments of 10-15 cm around the perimeter of the sheet. You can further fix the plate in the central part. Do not forget about the gaps between the plates and around the perimeter of the room.

Advice! To make it convenient to fix the sheets on the crate, it is worthwhile to think over the step of the rails in advance so that it matches the dimensions of the plywood or cut the plates into smaller pieces.