The desire to have a fireplace in your home is understandable. It is a symbol of coziness and comfort, and the place near it becomes a favorite for all family members. This building can be installed in any room of private ownership, the main thing is to choose a suitable model.

To know how to make a fireplace in the house, you need to consider its different types and decide which one is suitable for a particular room.
So, for a large hall, a massive design is suitable, and for a small room you can choose a type that is modestly located in a corner and does not take up much space.
Types of Fireplaces
The fireplace for the house can have four locations - it is near the wall, adjacent to it with the back or end side, in the corner and in the middle of the room. All of them are attractive in their own way, but not every one of them is suitable for any room. Therefore, even if you really liked the fireplace, before you start working on it, you need to try it on the base, as it is its widest part.
Wall-mounted fireplace
A fireplace adjacent to the wall with its rear side is called a wall fireplace. This option, made of brick, is quite voluminous and can occupy a significant part of the room. Therefore, if it is not large enough, it is better to abandon this model, since it will clutter up the room and will look ridiculous, even if the fireplace itself will have an elegant look.

In a large hall, such a building is also unlikely to look presentable, as it simply gets lost in a wide space and will not produce the desired effect on the interior.
Rather, this model of the structure will be to a place in the medium-sized room, where it can manifest itself in all its splendor, provided that the decoration room is properly designed. In such an atmosphere, the fireplace will become the main accessory of the design project, to which furniture and decorative elements will be selected.
The device of a classic brick fireplace
Strictly speaking, open hearths are not suitable for heating private cottages because of the low efficiency of burning wood, the efficiency is only 20-30%. While the fire is burning, heat is distributed throughout the room through infrared radiation. After attenuation, the heating intensity decreases and stops after 2-3 hours, when the brickwork cools down.

An important point. It is unrealistic to build even a small wood stove in an apartment of a multi-storey building - there is nowhere to put out the chimney, and the ceiling is not designed for that weight. Reference: the mass of the mini-fireplace, whose design is presented below, is more than 700 kg, size - 0.5 x 1 m (load area - 0.5 m²).
Despite the low rates of heat transfer, fireplaces remain attractive to homeowners, as they create a unique atmosphere of home comfort. The device of the classic English hearth is shown in the diagram and includes the following elements:
- the underground part is the foundation,
- base of 2-3 rows of bricks,
- the hearth with a protruding platform protruding forward,
- portal - a brick frame of an open firebox,
- smoke collector - channel tapering upwards in the form of an umbrella above the combustion chamber,
- the chimney tooth at the beginning of the smoke collector serves for better heat removal from hot gases,
- a chimney leading to the roof
- traction force is regulated by a valve.
 The layout of the classic open hearth
If the construction budget allows, then outside the walls are lined with tiles, as is done above in the photo. It is not necessary to decorate the walls of the structure - the correct brickwork looks quite neat.
The size and location of the hearth in the room
When choosing the design and drawings of the fireplace, pay attention to the dimensions of the portal, the fuel chamber and the chimney. The indicated dimensions are selected according to the area of the heated room and are interconnected by such ratios:
- the cross-sectional area of the chimney pipe is 1/9 of the square of the portal,
- the firebox depth is 1.5-2 times less than the height of the portal opening,
- the area of the open opening is 1/50 of the square of the room.
If you make a large fireplace in a small room, the chimney draft will not have enough air flow. The hearth will begin to smoke into the room or "suck" air from neighboring rooms, and along with the heat. It is allowed to build a small structure in a spacious room, but the heating will be minimal - the fireplace will serve as a decoration for the living room and play the role of a barbecue.
For the convenience of determining the dimensions of the firebox and the chimney channel, depending on the square of the room, there is a ready-made table:
In shape fireplaces are divided into 2 types - wall and corner. In the publication we provide a description of the first variety - it is relatively simple. In order to build home foci of the angular type, it is necessary to gain experience in the furnace business. Having decided on the dimensions of the heater, select a place for installation taking into account our recommendations:
- Place the fireplace in the central part of the interior partition. If a private house is at the stage of redevelopment, repair or construction, the back wall can be brought to the next room by making an opening inside the partition.
- Near the outer wall to make a fireplace is impractical - part of the heat will go to the street.
- Think about convenience - do not place the building near the interior doors and do not place furniture back to back.
- Carefully study the design of the ceilings and the rafter system so that the chimney does not fall into the support beam or on the edge of the reinforced concrete floor slab. The minimum distance from the duct wall to the rafters is 10 cm (taking into account the fire furnace cutting).

When choosing a site for a fireplace, do not forget about the foundation. In the living room you will have to disassemble the floors, dismantle the screed and dig a foundation pit, without affecting the existing base of the building. Remember, house engineering networks - sewerage, plumbing or underfloor heating - are not laid in the chosen place. The basement under the room is also a problem; not every floor can withstand the weight of the masonry.
Construction technology
The procedure for preparing and laying a fireplace with your own hands is proposed to be divided into stages:
- Selection and purchase of building materials.
- Preparation of a tool kit.
- Foundation device.
- Brickwork of the body of the furnace and chimney.
- Drying and primary kindling.
We will consider each item in the list in detail, then we will present specific projects and arrangements available for beginners to complete.
 An interesting version of the fireplace stove, where 2 furnaces are combined - open and closed
Choose a brick and mortar
Choose kiln brick taking into account the following requirements:
- for the main masonry, take a solid ceramic (red) brick of a standard size of 250 x 120 x 65 mm, hollow marks are not suitable,
- the walls of the firebox are laid out of fireclay (refractory) stones of grades Ш, ША or ШБ,
- instead of refractory it is allowed to use clay full-body brick, carefully selected in terms of quality - without cracks, chips or other defects,
- the fireplace body is allowed to be laid out of used ceramic bricks, provided that the stones have remained strong, not saturated with damp and not cracked,
- if the budget allows, buy a figured brick with rounded edges, shown in the photo.

Note. The brand of fireclay stones is precisely indicated in the design of the hearth. Specify the number and shape of hewn bricks in accordance with the schemes - orders.
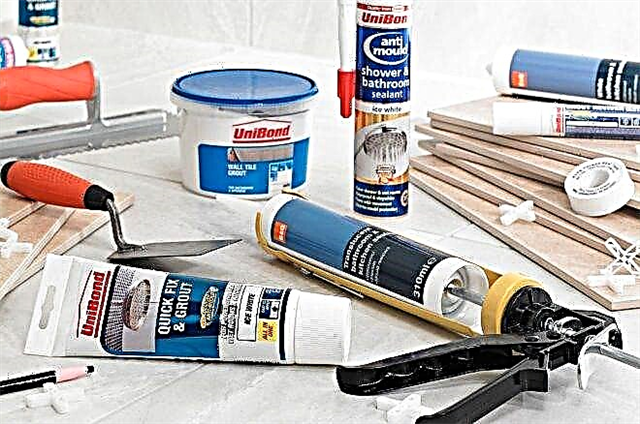
The simplest way to make high-quality masonry mortar is to buy in the store a ready-made clay-sand mixture intended for stoves and fireplaces. A similar product is commercially available for refractory masonry - fireclay clay and mortar.
If you are on the path to total savings, make a solution yourself:
- From natural clay, remove soil impurities and foreign impurities - stones, roots and stems of plants.
- Pour material into a large container and fill with water. Soaking lasts for 2 days.

- Topping up the water, bring the composition to the consistency of cream and pass the clay through the sieve. The goal is to remove all extraneous inclusions.
- Add dry sand to the clay solution, passed through a sieve with a mesh size of 1.5 x 1.5 mm. By mixing the composition, achieve optimal fat content.

The solution is considered to be suitable for work if the “sausage” rolled up from it does not crack or crumble with a diameter of 10-15 mm when wrapped on a wooden stick Ø4-5 cm.
Reference. The finished clay-sand solution is stored indefinitely. If the composition has time to dry before use, it is enough to dilute it again with water.
Purely clay mortar for laying the foundation and chimney device is not suitable - you need to add lime or cement. Therefore, for the construction of the fireplace, prepare additional building materials:
- Portland cement M400,
- sand,
- roofing material for waterproofing,
- felt (used), roofing iron,
- broken stones of any origin,
- boards or panels for formwork,
- polyethylene film (second-hand allowed, but without holes),
- steel knitting wire,
- asbestos cord.
Tip. Instead of felt, basalt cardboard is successfully used.
Of course, the construction of a fireplace will require stove fittings - doors, latches, and so on. The exact quantity and dimensions are listed in the project. To form the arch of the portal, metal corners or fittings will also be required. In order not to plaster and decorate the finished hearth, purchase a special fire-resistant enamel.
Cooking stove tools
The full set of tools used by the furnace masters is shown in the picture. But since the ordinary homeowner does not have all the devices shown, we will give a list of tools that can not be avoided when erecting a fireplace:
- pickaxe
- a hammer (preferably rubber),
- building level, tape measure,
- square, cord and plumb,
- wide brush
- Master OK,
- pliers
- ruler and scriber - a pointed metal rod.

A beginner, not trained in tricks and splitting bricks, will do a lot of marriage and mess up a lot of material while getting used to work. Hence the advice: cut stones with a grinder equipped with a circle on concrete. To get less dust, go outside or into another room.
In addition to the listed devices, you will need a bucket and dense fabric for wiping the brick walls. A small spatula or a metal scoop with a broom is also useful.
Laying a solid foundation
How to make the base of the fireplace is described in detail in another step-by-step instruction on the construction of the stove. Briefly indicate the stages of work:
- Digging and excavation from the pit, whose dimensions are 10 cm wider than the dimensions of the future outbreak. Depth depends on the location of stable soil layers, but not less than 0.5 m.
- Filling the pit with rubble stone, strengthening with liquid clay or lime mortar.
- Laying 2 waterproofing layers of roofing material.
- Installation of formwork, pouring reinforced concrete slabs with a thickness of 15-20 cm.
- After 4 weeks (complete hardening of concrete) - laying felt soaked with liquid clay and erection of 2 continuous rows of ceramic bricks.

Note. Instead of reinforced concrete slab, you can use brickwork on cement mortar, ending at the level of a clean floor. In this case, the rubble foundation can be loaded much earlier - in 7-10 days.
The foundation of the fireplace is a completely independent structure, not connected with the foundation of a private house. The minimum distance between them is 50 mm, but it is better to withstand 10 cm. Treat the accessible side surfaces of the foundation with bitumen for waterproofing.
A plastic film is covered over the cladding and formwork so that the liquid concrete does not lose the cement milk. The clay soaked in clay is laid on the finished plate, as shown in the diagram. The first two rows of stones are considered zero and are not reflected in the orders of the fireplace, their task is to protect the felt pad from high temperature. For more information about the technology for laying a reinforced concrete foundation, see the video:
Mantel Instructions
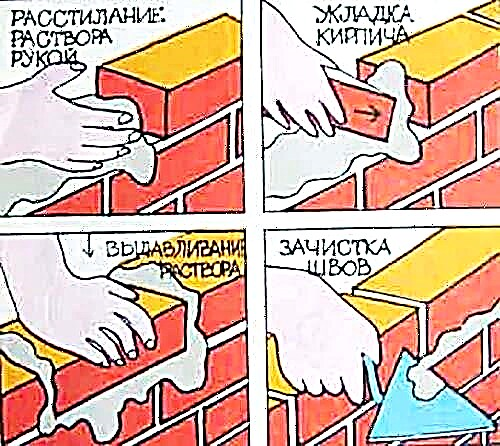
Before you lay out the fireplace, select the best brick on the firebox, clean the used stones from soot, dirt and adhering old mortar. When ready, proceed to the important stage - laying the first row. Step-by-step technology looks like this:
- Retreating 5 cm from the edge of the foundation, collect the first tier of bricks dry. First install the outdoor beautiful stones, then fill the middle.
- Using a square and a wooden plank, align the bricks in a line with a 90 ° angle.
- Measure the length of the diagonals with a tape measure. The maximum allowable discrepancy is 5 mm.
- Lay all the stones on the solution, controlling the horizontal level.
The following rows are laid out in the same way - forming a model on a dry, fitting and cutting stones, setting for a solution. The vertical and horizontal masonry is constantly monitored using a plumb line and a building level.

Advice for beginners. There is a simple technique that allows you to ensure the verticality of the masonry. After forming the first two rows, project the corner points on the ceiling using a plumb line and hammer in nails or dowels. Tie cords with weights to them, which will serve as markers of the dimensions of the fireplace. Instead of twine, you can use vertically mounted iron corners, then leveling the masonry will become much easier.
When erecting the walls of the fireplace, be sure to observe the following rules:
- Immerse the red brick in the bucket of water for 2-3 minutes before laying - air bubbles will come out of the pores. Refractory stones do not need to be soaked, only rinse with dust.
- The maximum thickness of the seam is 5 mm. Press the brick to adjacent stones, while leveling and removing the excess mortar on the sides with a trowel.
- The walls of the gas channels should be smooth. Turn the bricks evenly into the flue, and every 3-4 rows, wipe the masonry from the inside with a wet rag.
- Before laying the smoke box with a chimney tooth and sloping walls, where you need to do a lot of clippings, lay the model of the element dry. This will clearly fit sawn bricks.
- Fireclay and ceramic masonry, having different coefficients of thermal expansion, do not bind to each other. Provide a gap of 3-5 mm, where sheets of basalt cardboard are inserted.

- Before installation, wrap the fireplace doors with asbestos cord at the points of contact with the wall. Fix the elements with knitting wire, aligning vertically and horizontally.
- Put the valve on the clay mortar - you need to open the valve and put it on the frame.


The ceiling is made of steel corners, supported by the walls of the portal. The upper row of stones is laid on the metal without solution, only the side seams are filled. Semicircular arched arches are formed using special patterns of wood - circled, shown in the photo.
 Spinning can be made of plywood or wood of any quality, but the shape of the support must be clearly verified
When installing a chimney, change the formulation of the solution - instead of clay, add cement. The ratio of binder to sand is 1: 4, and density is medium. Cutting is performed in the wooden floor of the house, providing a 38 cm fire spacing from the smoke channel to combustible structures (see diagram).
Over the roof surface, a thickening of the pipe is made - an otter that closes the junction of the roofing with brickwork. At the end, a closed type head is formed, protecting it from precipitation inside the fireplace.
 For stoves and fireplaces, the fire rules are the same - the distance between the smoke channel and the wooden floor should be at least 380 mm (one and a half bricks)
Drying and first kindling
Sand and clay mortar does not harden, but dries. The drying process takes 10-14 days, during which observation is made. Small cracks that occur in the masonry of the fireplace are sealed with the same clay mortar. At the end of the specified period, make a test kindling:
- Having opened the valve, light a small armful of brushwood and slivers on the hearth.
- Gradually add small wood while maintaining a small fire. This will allow the solution to dry completely.
- If after 3-4 hours no cracks have formed in the fireplace body, you can increase the portion of firewood. Take your time and first make sure that the walls of the hearth are warm.
Tip. Due to air congestion in the chimney, draft may initially be absent. The pipe must be heated using a torch or a small bonfire, kindled on a view.
Fireplace masonry techniques, see the following video:
Fireplace adjacent to the wall
This version of the fireplace is designed to be installed in a large or medium-sized room. He is able to divide the room into separate zones or form an additional wall, which will reduce the unnecessarily wide passage, for example, between the hallway and the hall. A metal through firebox can be installed in the fireplace, equipped with heat-resistant glass on two or even three sides, and a fire-resistant brick can be built facing the room, and the back wall will decorate the hall with masonry.

The fireplace successfully divides the room into two zones
For a small house, this fireplace can only be used if there is only one room in the building. It can help to differentiate it into two and make the house more comfortable for living.
A fireplace in the middle of the room
A fireplace in the middle can be suitable for a large room and a medium-sized room. For a small room, it will not work, as it will interfere with the passage. It can be built of brick and have a massive structure - this model is for a large spacious area.

Island type fireplace
For medium sized rooms, they usually get a ready-made compact metal fireplace with a through firebox with transparent walls, which will allow you to admire the fire from both sides of the room. This interior accessory will distract attention from the rest of the room's decoration and will become its main decoration.
Corner fireplace
The corner version of the fireplace is the most optimal for a small room, although it is quite suitable for large rooms. This building can be compact and neat or massive and monumental, and its size will depend on the space provided for it. Such a fireplace, like any other, can have a finished metal firebox, which is very simple to install - you just need to insert it into the finished "portal". Or a traditional brick, made of heat-resistant material.

Corner Type Fireplace
The design of the corner fireplace is simple and it will not be difficult to erect it. External modernization is possible, for example, the addition or increase of side shelves, surface cladding with your favorite finishing materials or brick laying for lining. The main thing is to preserve the internal structure of the furnace and the chimney.
This model will definitely transform the room and make a special cozy note in its interior.
Building structure
A fireplace of any kind has at its core one design and consists of four departments:
- a smoke box located above the furnace and serving as a guide for smoke coming from the furnace into the chimney,
- a niche for storing firewood or a blow hole, if the firebox is supposed to be closed.
Another important part is the decorative finish of the facade part of the structure, including the portal around the firebox. Design does not affect the functionality of the structure, but a well-functioning, but inaccurate and ugly fireplace will spoil the look of the entire interior. Therefore, special attention should be paid to the exterior decoration of the building.
In addition, the fireplace may include in its design an air or water heating system. That is, heat exchangers are built into the fireplace, and they are connected to the heating circuit. Such models may well heat one or two rooms. In order for heat transfer to be higher, it is best in this case to arrange a closed firebox so that heat is not wasted in vain.

Typical fireplace patterns
On the presented schemes, it is possible to consider the internal structure of fireplaces well, so that when laying, they can be guided by them.
We are looking for a place to install
The installation location is chosen not only for the aesthetic factor and convenience for the owners, but also taking into account the above characteristics and design. It must be remembered that the chimney will be led outside through the ceiling and roofing, and it should not stumble on the ceiling beam and the roof rafters.
In addition, the installation site should contribute to the heating of the room, so if the fireplace is folded near the door to the room, it will create a small but warm curtain for cold air. It is also not recommended to put a fireplace in front of the window, as drafts will be created in the room.
Be that as it may, the fireplace will not be able to cope with the heating of the whole house, therefore it is installed only as a means of additional heating and creating a warm atmosphere in the house and a cozy atmosphere.
When the installation location is determined, it is worth calculating the dimensions of the future fireplace and drawing up its drawing. It will be nice to draw a chalk on the installation site in size of its base - this process will help to visually determine how much it will protrude towards the room. In the drawing, it is necessary to put down all the dimensions.

Wall fireplace drawing
This drawing shows a wall fireplace with a built-in metal firebox, which can also help in drawing up your own drawing for the selected model.
Furnace selection
If it is decided to use a metal firebox, then the chimney must be selected according to the diameter of the pipe already on it.

Easy-to-assemble ready-made firebox
In specialized stores today you can buy a furnace of any configuration - open and closed, through and one-sided, as well as already with a built-in heat exchanger for the water circuit. Its design can be well seen in the diagram, where a similar firebox is shown in section.

Fireplace insert with integrated heat exchanger
The traditional brick firebox is laid out with white fireclay brick, placed on the front side. It is heat resistant, so it can withstand high temperatures. This work requires extreme accuracy, since the surface of the focus should be as even as possible. Therefore, the process of its device will take a lot of time. If there is no experience in the art of bricklaying, it is better to choose a finished metal firebox. It is perfect for the modern room interior.
Fireplace layout
In addition to the drawing, for the construction of a fireplace, you will need an ordinal masonry scheme, which can be selected on the Internet for the selected fireplace model. It should look something like this.

Ordering a simple fireplace
This is the simplest scheme for construction, quite feasible for a beginner stove-maker. Following it row by row, observing all the nuances, you can raise the structure. But sometimes construction should begin with the foundation.
Fundame nt for a fireplace
The foundation for the construction of the fireplace is not always required, for example, it is not needed in those cases when the masonry will be arranged on concrete floors, and the structure is not very massive. Then the masonry can be started directly on the floor marked for the first row, and it is best to do it dry first, i.e. without solution. Then, after understanding the process, the following rows can be laid immediately on the solution.
The foundation device is required if a new house is being built and the foundation is being laid, especially if it is tape. For a fireplace, the foundation is done separately - it should not be connected with the general foundation of the house. They dig a pit for him and arrange a sand cushion in it, then put the formwork, which should rise above the pit by 10 - 15 centimeters. Then the pit is reinforced and cement mortar consisting of cement and sand 1: 3 is poured into it. The foundation is poured in two to three steps.

Foundation device diagram (if needed)
In the diagram you can see the entire foundation in layers. But, it must be remembered that the foundation should be in the shape of the base of the fireplace and be larger in size by 15 - 20 centimeters.
Chimney
As mentioned above, the chimney must have a certain size. If, when installing a metal furnace, it is known in advance, since the pipe already has the desired diameter, then when erecting a brick, its section must be calculated.
This is necessary so that there is good traction, but at the same time it is not excessive, so that the heat simply does not fly out into the pipe. The size of the chimney channel depends on the size of the hearth and is usually 20 × 20 or 25 × 25 centimeters, with an average furnace size of 60 × 75 centimeters.

Mandatory thermal insulation of wooden walls ...
A metal pipe is put on the nozzle of the furnace. For fire safety, it must be separated by a heat-resistant layer from combustible wooden walls. This process is carried out before closing the chimney with a decorative screen, which can be made of heat-resistant drywall fixed to a metal profile. This process can be explored by watching the video below.
In this photo - a chimney, separated from the log wall, and passing through the ceiling.

... and passages through the ceiling.
Next, you need to consider the passage of the pipe through the thickness of the ceiling. Around it is best to arrange a box that will separate the pipe from wooden parts at a distance of 15 ÷ 20 centimeters, in which non-combustible material, for example, mineral wool or expanded clay, is laid. On top of the insulation box is closed with a metal passage, which in finished form can be purchased at a specialized store.
The tip of the chimney, discharged through the roof, is well waterproofed - this can be done using different ready-made passages. They are made of flexible material that easily takes the form of a roof topography or, as in this case, stainless steel. Such a passage is more suitable for a roof with a shallow relief.

Roof passage waterproofing
An umbrella is necessarily put on top of the pipe, protecting the chimney channel from dirt and precipitation from the outside.
The design of the passages of a brick pipe takes place in the same way as a metal one. Her masonry runs according to a separate ordinal scheme.

Brick pipe passages through floors and roofs are much more difficult to make.
It is rather difficult to make this work, for its implementation it is better to invite a master stove-maker. But it should be noted that a metal pipe can also be installed on a brick fireplace, which, if desired, can be covered with brickwork before it enters the attic.
Other types of fireplaces
In addition to wood-burning fireplaces, heaters using other fuels are available for sale. Such models are installed much faster and easier than brick models, as they are sold ready-made and require a minimum of effort to connect them or simply install:
- A gas-powered fireplace is simple not only to install, but also to operate, but it must be connected by a master who has permission for this. In the organization engaged in monitoring the gas supply, it is necessary to obtain permission to install it, and this is often the reason for the reluctance to install this device.
For a gas fireplace, you do not need to install a separate chimney pipe - it will be enough to connect it to a coaxial chimney, which is discharged through the wall.
Inside the firebox are accessories that imitate firewood and live fire.
- Electric fireplace is suitable not only for the home, but also for the apartment. Such models can be stationary and mobile. Some stationary fireplaces are made in the form of fireplace inserts with beautiful portals around the hearth. Such a device does not require a chimney, it just needs to be installed and connected to an electrical outlet. Modern models of fireplaces are equipped with electronics, which allows you to control its heating, switching and switching off using the remote control.
- Recently, eco-fires running on ethanol have been actively entering into fashion. They do not require other fuels and are economical enough, but they do not warm the room, and serve only as a decorative decoration of the interior. We can say that the biofireplace is designed to warm the soul and create a certain mood and atmosphere, rather than as a heating device.
- You can also make an imitation of a fireplace from drywall and a metal profile. Of course, in such a decorative fireplace it will not be possible to light a fire, but it will perfectly decorate the wall and serve as a shelf for interior accessories.
If there is a desire to install a fireplace in the house, there will be no problems with this, just adequately assess your strengths, whether you are ready to lay out a brick fireplace or your zeal is enough only for the purchase and installation of a decorative fireplace. To date, the choice of materials and finished products is so wide that it is not difficult to purchase or build the desired version of the fireplace. The main thing is that you need to get together and do this business closely, and if you have already started, be sure to finish it to the end!
Do you like the article?
Save so as not to lose!