The foundation is the foundation of any building. It has a direct impact on the quality and reliability of the building as a whole. Do you want your bath to be strong and serve you for many years? Make a quality foundation!
The basis for the structure can be of different types: there is a foundation for a bathhouse columnar, strip. There are other types, but usually during construction they choose between these two options.
The strip foundation is the most popular option, which is more reliable than the columnar one, but its construction requires a lot of effort and time.
Strip foundation for the bath: advantages
- ability to withstand high loads. A strip foundation can support the weight of even buildings that have several floors,
- easy installation. To build this type of foundation, you don’t need to use special equipment and sophisticated technologies,
- speed of construction. If you use ready-made concrete, then the construction of the foundation will take a week, and if you yourself - less than a month,
- reasonably low price. The strip foundation for a bath usually has compact dimensions, so to create it does not require a lot of material. During construction, cheap raw materials are used: concrete, reinforcement, boards and rubble,
- the possibility of subsequently making a cellar or basement,
- universality. A similar type of foundation can be used in the construction of a bath of timber, aerated concrete and even brick.
Strip foundation for the bath: disadvantages
- a lot of weight. Concrete is a heavy material, so if you choose the wrong place for construction, you may encounter the fact that the building will sag on one side,
- the need for a thorough study of the soil and the calculation of the depth. The depth of the strip foundation under the bath is directly dependent on the soil. If the foundation is made too shallow, then the building may sag and deform,
- the impossibility of building on the ground with a weak bearing capacity.
Do-it-yourself strip foundation under the bathhouse: types and their features
This type of foundation can be of several types. If we consider its types by device, then there are two types: monolithic, prefabricated and monolithic prefabricated.
A feature of the monolithic foundation is that when it is erected, a reinforced formwork trench is made into which concrete mortar is poured. Prefabricated base involves the assembly of prefabricated reinforced concrete blocks of factory production.
Currently, there is also a precast-monolithic technology, which includes two types of foundation devices: part of the base is made of reinforced concrete, and the other of the blocks.
Depending on the depth, the foundation can also be of several types: not deep or deep.
Shallow strip foundation for a bath is the best option for small and light baths, for example, made of wood. It can be laid on sand and clay. Its advantage is its shallow depth (about 0.5 m), which makes building materials less necessary for its construction, which leads to significant savings.
A recessed strip foundation is a high-quality and reliable foundation, ideally suited for the construction of large and massive baths, as well as two-story baths combined with a house, etc. But note that this type of foundation will require large financial expenses, and it is much more difficult to install .
Depending on the material that was chosen for the construction, the foundation can be:
- brick,
- rubble,
- sandy,
- soil cement
- reinforced concrete.
The most reliable foundation is recognized from concrete.Large stones weigh about 30 kg and have a length of about 0.3 m. They are quite inexpensive. This foundation is easy to do with your own hands. If the soil is sandy and rocky, rubble foundation will not work, as it can crack quickly.
The brick foundation is also widespread, but its peculiarity is that the brick is a hygroscopic material, therefore, the foundation cannot be made at a great depth or near groundwater. The brick base is suitable for dry sandy soil. Only red brick is used for the foundation, since it is less susceptible to water.
Sandy and soil-cement foundations are suitable only for the construction of light non-residential premises on a solid foundation.
Reinforced concrete foundation is a cheap, but at the same time quite durable type of foundation, which is also suitable for complex baths. To raise this material you need to use a special technique. With your own hands, you can make a foundation using blocks measuring 20x20x40 cm.
More information about the features and types of the strip foundation of the bath in the video:
What brand of concrete for a strip foundation for a bath is better?
Of course, the foundation of reliability of the foundation is the use of high-quality material. When choosing a concrete brand, you need to focus on the total weight of the bath, type of reinforcement and soil.
If you are planning to build a small and light structure, for example, a frame bath on a strip foundation, then concrete of grade 200 is suitable for you. If the structure is heavy, but not too bulky, it is better to choose grades 250 or 300.
For the construction of heavy and massive structures will need concrete grade 350.
Also pay attention to the quality of the soil. If it is strong and dense enough, then concrete grades 200 or 250 are suitable. For shaky and heaving soil, use better concrete - from 300.kr
The higher the grade of concrete, the higher the quality and cost. It is not recommended to save on concrete, since a poor-quality foundation will lead to a significant reduction in the service life of the entire building and its premature destruction.
Stage 1. Preparation of the territory
It is necessary to clear the area on which construction work will take place from garbage, stones, trees and shrubs. If grass grows in the area, it is recommended to remove the top layer.
It is not necessary to clean the site itself exactly on which the building will be erected, but the territory is slightly larger (at least 1 m on each side).
Stage 2. Laying out the foundation plan, preparing the trench
To do this, you need pegs, a square, a tape measure and twine. It is necessary to drive pegs into all corners of the future building, then pull the twine between them.
After preparing all the points, you can proceed to digging the trench.
The dimensions of the strip foundation under the bathhouse may vary depending on the planned construction and the type of soil. When choosing the depth of the trench, you need to focus on climatic conditions. The height of the strip foundation for the bath is usually 0.5-0.7 m.
For fine sandy soil and non-porous clay soil, characterized by high hardness, a trench with a depth of half a meter with a freezing depth of up to a meter, 0.75-1 m - with 1.5-2 m will be enough. For a sandy soil, the trench should be at least 0.6 m and above the freezing depth. For heaving soil, a trench should be prepared to the depth of freezing.
The width of the strip foundation of the bath directly depends on the width of future walls. It should be about 0.5-1 m. But if the soil is weak, then its increase to 2-2.5 m is permissible. Accordingly, the trench itself should be slightly larger (about 0.2 m) than the width of the foundation.
In addition, the width of the foundation passing under the internal partitions is usually made 0.1 m less than under the external walls.
The bottom of the prepared trench should be covered with a sand cushion, its thickness should be 0.1-0.2 m.First, pour a layer of sand into the trench, then pour it with water and ram it, and then cover it with gravel, then level it again.
A pillow is needed to prevent distortions and deformation of the building. In addition, a layer of sand protects the foundation from sudden temperature changes during periods of rain and snow.
Stage 3. Formwork for the foundation
Formwork is a frame that will set the shape for the future foundation. For it, you need to use boards with a thickness of at least 30 mm or chipboard 20-22 mm. The height of the formwork should be at least 30 cm, it is necessary that it exceed the height of the future foundation.
It happens that the formwork is left and used as additional thermal insulation. In this case, its height should be equal to the height of the foundation itself.
To install the formwork, you need to install supports on the edges of the trench and attach the walls of the structure to them. It is important that the inner surface of the frame is as even as possible.
So that when pouring concrete the solution does not fall into the cracks, it is recommended to cover the formwork with a film or a layer of roofing material.
Below is the video: Do-it-yourself tape foundation of the bath. Formwork:
Stage 4. Reinforcement of formwork
Despite the fact that concrete itself is a strong and reliable material, it must be taken into account that the load on it will be enormous. In addition, concrete is completely non-plastic, so reinforcement should be done. Such a reinforcement will help protect it from destruction.
For reinforcement, fittings with a diameter of 1.2-1.6 mm that have passed anti-corrosion treatment are suitable. In the bottom of the trench you need to drive in two rows of reinforcement segments. A gap of 5 cm must be left between them and the walls of the formwork, it is important that the segments are lower than the foundation by about 5 cm.
After that, put the rods at the bottom and tie them with wire to the vertical supports at a distance of 7-10 cm from the bottom. Under the bars you can also put broken bricks. The top row of reinforcement should be below the foundation level by approximately 7 cm.
If you are making a strip foundation for a bath with a drain, then just at this stage you need to take care of communications. It is recommended to make them underground. To prepare the technological holes, it will be necessary to cut off part of the plastic pipe and attach it to the fittings in the right place.
Stage 5. Pouring the foundation
To fill the strip foundation under the bath, you can prepare the mixture yourself or buy a finished one. The advantage of the latter option is to reduce work and reduce the time to prepare the foundation for the bath.
Then you need to remove all excess air from the concrete to make it more dense. To do this, it is necessary to level it and pierce with a bayonet shovel. For the same purpose, formwork from the outside must be tapped with a hammer.
If the weather is hot outside, then you need to water the foundation at least a couple of times a day, if on the contrary, it rains constantly, then cover the base with foil.
After 3 days, the formwork can be removed. The erection of the walls of the bath can only begin 3 weeks after the erection of the foundation.
Now you know how to make a strip foundation for a bathhouse. This option base has many advantages. It is quite versatile and suitable not only for small buildings, but also for multi-storey buildings.
Do not save on the foundation, if it is strong and reliable, then the bath will serve you for many years!
Features of the soil that should be considered when building a foundation
The soil in the area where the bath will be built must meet certain requirements in order to avoid subsequent subsidence of the foundation and the entire structure. For example, soil based on peat, silt or fine sand is completely unsuitable for this purpose: it is prone to swelling, creeping and uneven liquefaction.
Sometimes, in such cases, a coarse sand cushion is a good way out.To do this, dig a trench corresponding to the size of the foundation, lay the bottom with coarse-grained sand, watered with water and carefully tamped.
Of course, a homogeneous, dry soil with good density is ideal for foundations.. But not every owner can boast of such a wonderful site. In the case of heterogeneous soil with high humidity, the foundation foundation should be dug to a depth of half a meter or more. The fact is that during winter frosts, soil with high humidity, freezing, will raise the foundation, and in summer, after melting and drying, it will lower. From this wall can "tune up" and give cracks. To avoid this, you should find out the depth of soil freezing, and during construction, lay the foundation 20 centimeters below this level.

The most common types of foundations used in the construction of baths
Usually in our latitudes for a traditional Russian bath, a columnar, strip or slab foundation is preferred. These types of foundations are quite simple in construction and reliable in operation. In addition, it is easy to find materials for them in any construction supermarket.
When choosing the type of foundation should, first of all, be guided by the type of soil in the area where the bathhouse is being built. For example, a columnar foundation is usually installed on clay or loamy soil with a deep occurrence of groundwater. The advantages of a columnar foundation are especially noticeable when building block, framed or chopped baths, in such cases additional jumpers between the columns are not required. Loose, poor-bearing soil is not suitable for this type of foundation, and the use of heavy materials in the construction is not recommended.
The strip foundation is usually used in the construction of small structures. The structure of this base includes reinforced concrete blocks and rubble stones bonded to each other. Depending on the type of construction and the size of the log house under construction, the width of the foundation is calculated. The strip foundation is quite simple in design, but it will require high labor costs, a large number of works and materials used in the construction.
The slab foundation (it is also called monolithic) is considered by many to be the most reliable. It is the best option if the soil in the building plot is weak and prone to swelling. In addition, when erecting the walls of a log house, using a monolithic slab as a foundation, you eliminate the need to fix the wall in a certain area of the base. On the contrary, the walls can be moved as you see fit, and besides, they can all be load-bearing. The slab foundation will protect the bath from the penetration of rodents and insects and will not require expensive waterproofing.

Each of these types of foundations requires a careful approach to the construction, so we will consider them in detail separately.
Building a foundation of a columnar view
Installation of the foundation begins with a breakdown of the site allocated for the construction of the bath, according to the plan. At the same time, the use of the Egyptian triangle with sides 3 X 4 X 5 will be optimal. This will help to correctly set the right angles of the base. It is easy to make such a triangle yourself from improvised means: boards and ropes. Correctness of the angles is checked by measuring and comparing the diagonals.
The recommended distance between the installed poles should not exceed 2.5 meters. The materials used in their construction are concrete, reinforced concrete, brick or stone. In places where the inner and outer walls are joined together, the posts are placed at an angle of construction. In such cases, the gaps between the posts may exceed 2.5 meters, so you will need to install additional supports. The standard cross-section of the pillars for the foundation for the construction of the bath is 50-60 cm, but it can be made smaller if you are building a light-weight bath.
A simple bath can be installed not on stone, but on wooden poles, popularly called chairs. This version of the foundation for the bath will be much cheaper. The principle of the arrangement of such pillars is no different from the installation of stone or concrete fortifications.
The depth is calculated at which wooden poles should be dug, based on the depth of freezing of the soil. To it is added about 25 centimeters.
Before walled up the chairs in the ground, they should be thoroughly dried and treated with antiseptics. In order to reduce the impact of external factors on wooden poles, they are wrapped in waterproof material, for example, roofing material or a polyethylene film, and coated with tar.
When erecting concrete and brick supports used as the basis for a columnar foundation under a bath, special attention should be paid to the fact that they do not withstand tensile deformation. To prevent it, the pillars should be built strictly vertically: this will help to avoid eccentric impact. During construction, the cross section of the pillars is recommended to be overestimated.
Column foundation on drill piles
In modern construction of bathhouses, do-it-yourselfers increasingly use a columnar foundation based on drill piles. Such piles are quick and easy to build. For such a foundation you will need:

You will spend no more than 30 minutes on drilling a well with a depth of about one and a half meters.
If the soil on the site has standard bearing characteristics, then the diameter of the well is up to 25 centimeters. An asbestos-cement pipe 20 cm in diameter is placed in the well, the gaps on the sides are filled with sand and concrete mortar for leveling. The solution also fills the pipe from the inside.
The next step is raising the pipe to the height set according to the design. At the same time, a certain amount of concrete mixture will come out of it, which will become the basis for the pile. If necessary, the solution is added inside the pipe, while 10-15 cm should remain to the upper level. After the mixture is compacted inside and out, fittings are inserted into it.
Using this technology, make the required number of posts. In the summer, in the heat, such a support will dry for no more than a week. When it rains, cover it with plastic wrap to prevent water from entering.
The column foundation for the bath is ready. Now you can start building walls.
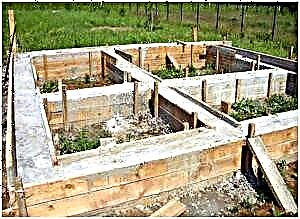
Building the foundation of the tape view
The strip foundation under the bath is a continuous reinforced concrete strip around the perimeter, practically not buried in the ground. The depth at which the base of the foundation will be located is calculated based on the characteristics of the soil: dry and sandy soil allows you to raise the sole 50-60 cm above the freezing level, wet and uneven - requires installation 20-30 cm below this level.

In the case of construction on uneven ground, white fine sand will serve as a pillow for the foundation. Such a pillow consists of three identical layers. Each of them is watered and rammed. As a result, a three-layer pillow should be 30-40 cm thick.
A uniform layer of gravel about 15 cm thick is poured over the sand cushion, which in turn is poured with cement mortar. This procedure is repeated several times until the gravel poured by the solution reaches a zero level, that is, the surface of the earth. At this level, a wooden formwork is made, into which concrete is poured, and a waterproofing layer is installed. As such, it is advisable to use 2-3 layers of roofing material laid tightly on a vertical surface, and bitumen mastic.
How to make a foundation for a bath?
The answer to this question depends on what type of foundation is chosen for construction, taking into account the geology and hydrology of the site, as well as the future base load. We will briefly review the schemes of work on each type, and you will find detailed plans (what and how to do) in separate articles to which we will refer. In particular, we recommend reading:
However, the work plan has common points - they are the same and I don’t want to repeat. Before proceeding to the layout of the future bath, you need:
- remove trees, shrubs and large stones from the territory,
- cut off the fertile soil layer and transfer,
- to smooth out the irregularities of the site in the building spot - manually or using a bulldozer.
Markup - This is another general point, but the chapter below is entirely devoted to it. And now we will consider the different stages of laying for each type separately.
Pile

How to make a pile foundation for a bath. This view suggests minimal disturbance of soil integrity. On the prepared and marked site in the ground, either wells are drilled for the bored variety of the pile foundation, or iron piles are immediately screwed.
If we are talking about bored, then the well is strengthened with sand and gravel, then a casing is installed, into which the reinforcing cage is laid. After this, it remains only to pour concrete into each pipe and expel air from it.
In our article on pile foundations, you will find more information that interests you.
Tiled
Now a little about how to build a slab foundation for a bath.

- A sand and gravel cushion is poured into the finished pit with a layer of up to 30 cm.
- Formwork is placed on the cushioned pillow, a place is allocated in advance for future communications.
- After this, it is necessary to isolate the future concrete slab from moisture from the soil. To this bottom and side formwork is placed polyethylene. You can put another waterproofing material instead.
- The next step is laying a grid of rods from 8 to 12 mm thick (depending on the severity of the future building).
- Concrete is poured over the frame. After filling, it is still necessary to expel air bubbles from it.
How to calculate the foundation for a bath
Building a foundation for a bath is not an expensive business. It is possible to imagine the costs of foundation only after assessing the volumes of materials that will be needed for the selected bath size. We will show by examples how to calculate the foundation for a bath.
But first you need to calculate the total load on the ground, which will provide a ready bath. You already imagine what size and from what material you would like to build a bathhouse and you can make a calculation. Calculate the area of the roof, walls and floors, and then multiply by the data from the table. Adding the results, you get the weight of the finished structure:
| Building element | Material | Density (kg / m²) |
| Walls (150 mm thickness) | Frame + mineral wool | 30-50 |
| Bar or log house | 70-100 | |
| Brick | 200-270 | |
| Roof | Sheet steel | 20-30 |
| Ruberoid | 30-50 | |
| Slate | 40-50 | |
| Roof tiles. | 60-80 |
If the floor is reinforced concrete, then consider it as 500 kg / m².
| On wooden beams | Basement (kg / m²) | Attic (kg / m²) |
| Density up to 200 kg / m² | 100-150 | 70-100 |
| Density up to 500 kg / m² | 200-300 | 150-200 |
The scheme of calculation of the strip foundation
Previous calculations are needed in order to select the optimal tape width based on the total load and soil bearing capacity. You should learn the latest from geologists.
To get started, take the width of the foundation tape according to the rule:
The thickness of the future wall + 10 cm
After that, calculate the area of the entire foundation tape. You can divide it into rectangles, then add their area. As a result, we get the value reference area.
It remains only to divide the total mass of the bath into the reference area to find out what the pressure on the ground will be. Compare with the bearing capacity of the soil - if it is less than the pressure of the bath, it is worth revising either the design or the width of the tape. (Generally, it is undesirable that the pressure of the structure was more than 70% of the bearing capacity of the soil).
We recount until the numbers are acceptable. Now that the area of the tape is known, it will not be difficult for us to calculate its volume. Multiply the area by height.This will be the volume to be filled with concrete. Count and weight, based on the fact that 1 cube of reinforced concrete weighs 2400 kg.
An example of calculating a columnar foundation (including bored piles)
In this case, we take one kind of pillars, for example, bored piles. They have a variety that has a main diameter of 300 mm, and at the bottom expands into a shoe with a diameter of 500 mm. From here sole circle area:
S = π x r² = 3.14 x 25 x 25 = 1962.5 cm²
You need to know two more values: the total weight of the bath and the bearing capacity of the soil (soil resistance). The first is calculated from the above tables, the second is recognized by geologists after the research. Suppose that the bathhouse is frame and its weight is 23,000 kg, the bearing capacity of the soil is 2 (we remember that it is worth taking only 70% of this value).
0.7 x 2 = 23000: (1962.5 x N),
where N is the number of columns.
From here it is easy to calculate that rounded is N = 9, but this is only the first approximation. Now we need to find out the weight of 9 columns and add it to the weight of the bath. We will consider this:
Pile length - 2 m
Diameter - 0.3 m
It remains to multiply the area of the circle by the height of the cylinder to get the volume:
V = π x r² x h = 3.14 x 0.15 x 0.15 x 2 = 0.1413 m³
Accordingly, the volume of 9 piles is 1.2717 m³, which, with a mass of 1 cubic meter of reinforced concrete, 2400 kg gives 3 052 kg, which we add to 23 000 kg of the mass of the bath. Counting again:
N = 26,052: (1.4 x 1962.5) = 9.48 rounded 10 piles
It remains only to distribute them at the points of maximum load and evenly between them.
The calculation scheme of the pile foundation (here only screw)
Screw piles for foundations are 89 and 108 mm. The former are used only for light buildings, for example, wireframe. The second is for everyone else.
The simplest method of calculation is the arrangement of piles according to the plan of the bath at the corners and points of greatest load. (So it is recommended to put at least 2 piles under the stove).
Another option is to use information about the mass of the bath and divide it into the bearing capacity of one pile. Data can be obtained from the table below (this is a calculation for a pile submerged in soil at 2 m).

By the way, many sellers of piles put on their sites calculatorsthat count the number of piles for your case.
Slab foundation calculation scheme
And again, we must calculate the pressure of the bath on the ground to make sure that the structure is easier than it is able to carry out the soil without subsidence.
In the case of the slab foundation, we have a very large area over which the total load is distributed, but it is worth taking into account the fact that the stove weighs a lot.
Suppose a 4 x 4 meter bath is planned. And that we will put it on a plate 20 cm thick. Let the weight of the bath be estimated at 50 tons, and the soil resistance 2.5.
We already know that a cube of reinforced concrete weighs 2,400 kg. Then the mass of the foundation is 7680 kg. The total load is 58 tons per 16 squares or 3,625 kg per m². Soil can carry 2.5 kg per cm² or 25 tons per m². In the same way, you can calculate the load for your data.
General principles
Building a right angle - the problem can be solved "mechanically" or with the help of calculations.

Laser level BOSCH PLL 1 P
With calculations it’s easy: the square of the hypotenuse is equal to the sum of the squares of the legs, and the legs are our walls. You can simplify the case with integers: 3² + 4² = 5². For this, a Bechev 12 m is taken and its ends are connected very accurately. 3 and 4 meters are marked. It is enough to stretch the rope into a triangle so that a clear right angle is formed between the smaller sides (3 and 4).
Mechanical methods - This is either to use the square from the rails, or the laser level (the video will tell about the latter).
Anyway, it all starts from the lowest corner of the future bathwhere the first peg is hammered and a right angle with the given sides is built from it.
Then the diagonal is checked and the next right angle is built. So - until all the corners are lined up. Corner points are marked with pegs..
The next step is the marking of the internal or external circuit (depending on which you have not done yet). Corner points are also marked with pegs.
Casting is the next step in marking.
Racks of two columns with one or two crossbars are driven into the ground at a distance of 1.5-2 meters from the initial pegs (see below). it racks castoffs.
They are driven into the ground so that the edge of the crossbar is at a certain level:
- trimmed strip or slab foundation,
- the edges of the pipe, pile or column of the pile or column foundation (for foundations with grillage, two crossbars are made - the level of the column / pile and the level of the grillage).
Building threads stretched by risks on the crossbeams form the internal and external contours of the foundation in the air.

The depth of the trench or pit is counted from the castoff so that the perimeter is even regardless of the terrain.
Now we will analyze how to correctly lay out the foundation for the bath, depending on its type.
Nuances for different types of foundations
For tape The following risks are made on the crossbar:
- the axis of the wall in the center,
- the width of the foundation tape (axis in its center),
- the width of the pillow under the base.
We highly recommend watching a video that specifically talks about using the laser level when marking a strip foundation:
Pillar column or pile foundation notes:
- the height of the foundation (edge of piles or columns),
- grillage height
- axis of pillars or piles.
Corner supports are marked immediately by the intersection of threads. Intermediate supports are measured after. Axial points are lowered to the ground using a plumb line and marked with pegs.
Before drilling or digging pits, construction threads are removed.
Plate marking the easiest way, because only the borders of the slab should be noted.
When is it needed?
There are two real reasons that are not related to the horror stories about condensate, mucus and mold, which are often scared on the Internet (because ventilation copes with condensation much better than insulation).
- This desire is to reduce heat loss and time for heating the bath.
- As well as the protection of waterproofing from a violation of its integrity during the seasonal movement of freezing soil. Plus, reducing the heaving of the soil itself, if you insulate it too.
Usually, foundation insulation is typical for buildings with a basement. And baths are rarely made with a basement. Therefore, there is no urgent need for insulation.
 But if you still decide to insulate the foundation of the bath, then do it outside. There are people asking how to insulate the foundation of the bath from the inside, we do not recommend this. Internal insulation is not recommended.
As for the material, then it is better to take one whose life span is commensurate with the life span of concrete. Polyfoam in this regard is much inferior to concrete in "longevity" and a warm foundation will not be forever. Therefore, professionals recommend foam glass.
Warming the foundation of the bath can be done at the stage of laying. In this case, the width of the formwork is increased by the thickness of the insulating material.
In the case when insulation is done for the already built bath, have to:
open the foundation
- pour sand with gravel to the bottom,
- insulation can be simply glued to the walls of the foundation,
- at the end, the foundation is backfilled with soil, which must be carefully compacted.
If column foundationwill have to work even harder:
- a trench is excavated along each wall (width 0.5 m, and depth 1.5 m),
- sand and gravel are poured into the bottom of the trench, rammed,
- a wall of bricks is laid on the pillow, which is lifted almost before the start of masonry,
- the gap between the brick and the wall is foamed with mounting foam,
- bricks are oiled with bitumen mastic,
- the trench is backfilled and rammed.
Bar or log house
Consider how to put a log cabin on the foundation. To put the first (strapping) crown of a wooden bath, you must first waterproof the foundation, and soak the crowns with an antiseptic.
It is recommended to put a 50 mm thick board around the entire perimeter on the waterproofing, and only then put the first crown on it.The so-called cushioning board will contribute to the fit of the log house to the waterproofing.
Before laying logs are disassembled according to the marking.
Locks are cut in advance in logs or uneven bars. Usually the end is simply trimmed “in half a tree” - half the thickness of the crown.
The lower crown is often not attached to the foundation at all., because he and so will not shift under the weight of the bath.
Brick, foam block, cinder block
This is a group of block materials. Their laying on a strip or slab foundation is done immediately after its waterproofing. If the foundation is pile or columnar, then grillage becomes mandatory, and then everything is exactly the same as for tape or slab.
If you are just looking at the construction of a block bath, we also have an article on the foundation for a foam block bath. And another article with an overview of the options for foundations for block baths.
Frame
Usually a solid timber is used as a strapping for a future frame bath. But to his styling must be prepared at the foundation stage: studs with threads on the end should be firmly fixed to the foundation. A support beam will be worn on these studs and secured with nuts.
In a columnar or pile foundation, anchor bolts are mounted in a grillage.
The corners of the strapping beam are cut “in half the tree” and fixed with brackets and nails of 120 mm.
***
You got a fairly voluminous idea of how the foundations for a bath of various types are created. We can only wish you good luck in finding the desired.
Site preparation and layout
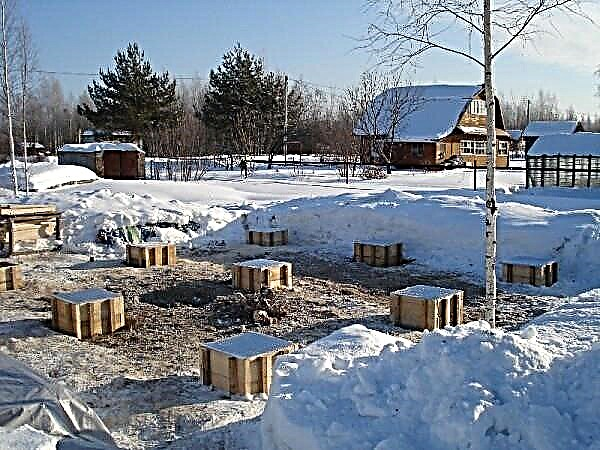
Construction begins with marking. We’ll need a little tool: 10 wooden stakes, a hammer, a tape measure of 15 meters long, a building cord of 25 meters, or a fishing line, a hydro level of 20 meters. Take a regular foundation made of expanded clay concrete blocks. Such a foundation for a bath with their own hands is built in a couple of days and does not require huge infusions of funds. Take the standard option.
We calculate the width of small pits. We take into account the insulation and binding of the foundation blocks of the bath: 200 mm block width, and 400 mm length. Basement height approx. 600 mm, 3 blocks. It turns out that the pits for development will be: 450 x 450 mm, with a depth of 0.8 meters - this is the standard size of the width and depth for the usual construction of a block base from expanded clay concrete blocks. Now let's move on to the development of pits.
Development of soil under the bath
To make the foundation of the bath with your own hands you will need: a shovel, bayonet, shovel, pickaxe, in case of the presence of stones, an ax for snags, and a cart for removing soil. Having dug the set depth, we precisely align all edges. The foundation for the furnace (bath stove) should also be provided. We must not forget that the device of the furnace inside the building requires the preparation of a pillow made of concrete. This is carried out before pouring the main monolith, after the calculation, a pillow is made, and then the support pits are poured under the expanded clay concrete blocks.
Pillow under the furnace or firebox
Dig a pit 1200 x 1200 mm to a depth of 600 mm. This depth is not accidental, 300 mm is poured with sand. Ram the pillow by hand tamper. The following are the steps:
- A layer of waterproofing material is laid at the bottom, so that it is with a margin, and the edges protrude outside the pit.
- Put the frame (formwork) to the required height, and pour a concrete slab of 200 mm.
- Warming is carried out with 50 mm expanded polystyrene plates, laying it directly on fresh concrete.
- Then pour the finishing layer of the screed, 50-150 mm. Insulation under the heating element is ready.
After concrete work on the installation of the bearing cushion, it is necessary to lay a network of water and sewage pipes and conduct their complete insulation.
Tip: The base under the furnace should not be in contact with the main foundation, as it has the property of expanding when heated. The gap is filled with sand after concrete work and the dismantling of the upper formwork.
Networks and drain
Let's move on to laying pipes for water supply networks. Calculation of the diameter and length of the water supply networks is carried out in advance, before the production of all concrete work. Separate trenches dig under the water supply pipes, to the pipe outlet points. The installation of water supply networks requires special skills and knowledge, but the preparation of trenches can be carried out independently. According to technology, pipes are laid on a pillow of crushed stone. The filling of the bottom of the ditches is equipped with gravel, the thickness of the standard layer is 80-100 mm. The ends of the pipes are displayed 100 mm above the floor, in the right place and are closed with plugs.
Subsequently, after all concrete work and the construction of the walls of the sleepers, all pipes and internal networks are installed. The depth of laying pipes into the ground from the outside of the room is 1200 mm, and from the inside 600 mm. Networking can be carried out simultaneously with the drain, laying pipes together.
A pillow for laying pipes and networks is rammed without fail. The slope is measured for laying sewer pipes, the height of the inlet and outlet openings, the drain angle. Before you make the whole foundation for a bath, take a drain for wastewater. Prepare a pit or pit, drain there. The optimal distance between the bath and the drain is 6-10 meters, otherwise the log house will damp.
Foundation insulation
The foundation for the frame bath can freeze, therefore, it is insulated from the outside with various materials. Warming is carried out before pouring concrete. Apply a sheet of foam or polystyrene, for these purposes they are optimally suited. Apply sheets with a thickness of 50 - 80 mm., With a size of 600 x 1000 or 1000 x 1000 mm.
They are fastened on the outside of the pits (on the outer edge), between the armature frame and the ground. Then the space is completely poured with concrete to the required height. Warming is obtained with high-quality and monolithic, durable. Expanded polystyrene does not absorb moisture. The service life of such materials is 25-30 years.
There is another option, how to conduct external insulation, having poured all the supports for the bath with expanded clay along the perimeter: after all concrete work, develop sinuses around each concrete base and pour out the expanded clay pillow. Such insulation will require additional costs for the development of soil and arrangement of waterproofing.
Foundation for heavy materials from expanded clay concrete blocks and foam blocks
A reliable foundation for an ordinary bathhouse with your own hands can only be done if you do not violate the basic construction technologies. Frame connected prepare concrete. Materials are calculated as follows: for the total cubic capacity of the foundation, take the ratio of materials: 12% cement, 25% sand, 45% crushed stone, the rest is water and clay. For expanded clay concrete compositions, the filler (crushed stone) is divided equally with expanded clay.
The composition will be warm, but requires the use of waterproofing materials without fail. Before building the foundation for the bath, from such a material, calculate the weight of the entire structure. It is suitable for lightweight construction from foam blocks, and for expanded clay concrete materials it needs to be strengthened. It is necessary to change the depth of the foundation laying, pour it deeper by 0.5 meters, this applies to each monolithic pillar.
DIY masonry blocks
The foundation in this case consists of expanded clay concrete blocks standing on concrete posts. To begin, mark the directions under the blocks, scoring 4 pegs on the outer perimeter of the future bath. Pull and level the cord to the height of about the first block. If you made base formwork when pouring concrete, the masonry is carried out according to its size, laying blocks on concrete pillows.
Lay in two blocks, filling the seam with mortar. Lay the next row perpendicularly, the edge of the expanded clay block or foam block should touch the cord. Blocks are mainly used in order to raise the height of concrete bases above the ground or with a large slope of the site. Lay the required height and leave it - let it dry.During masonry, lay studs between the blocks for attaching the log house.
The construction of the supporting structure for light materials
The weight of foam blocks is small up to 24 kg, with dimensions of 200 x 300 x 600 mm, in contrast to expanded clay concrete. The calculation of the foundation slab is not carried out as under the pillar foundation. In this case, the entire structure will lie on the plate, transferring all the loads to the soil evenly, so it is stronger.
Building a slab (a slab version of the foundation) is easier to do than a pillar version, but it will also work for a building from a log house. Depth is not needed for a monolithic surface foundation with a height of 1-1.5 meters, there are enough recesses in the soil by 40-50 cm along the entire plane or perimeter, it depends on the configuration of the log house.
The height of the above-ground part of the concrete slab is 10-15 cm. When casting, a monolithic layer (slab) is obtained, bearing the entire log house, evenly distributing the load from the building to the ground. The slab version is suitable, both for medium-weight buildings, and for structures made of foam blocks, foam concrete blocks, it is possible to erect a sauna from sleepers, build a log house, there are many options for using slab technology, as much as is necessary for high-quality construction of buildings.
A slab foundation for the construction of walls from foam blocks is equipped as follows:
- Marking under the slab is carried out, the building is taken in width and length, but with a margin of 800-100 mm. It will be correct to lay only a stove around the perimeter under the bath, and inside, at the end, fill everything with clay.
- The soil is removed to a depth of 400 mm, the foundation pit is filled with sand, 200 mm thick. For foam blocks this pillow is enough. Now we seal it around the perimeter, there should not be any gaps. Although the log house is not heavy, the slab should work along the entire plane, the depth here is not as important as the uniform compaction of soil and sand.
- Now they put formwork around the future foundation, the height of the board is selected along the protruding part, in this case 150 mm.
- They knit cards from 12mm reinforcement, with a cell of 300x300, lay on the prepared site, after having previously placed the distances from plastic, or by spilling small nickels from the solution. After reinforcing, you can fill the solution. Such a foundation will not dry for long, 7-12 days.
Tip: In the summer, the sand dries quickly, moisten it with water before pouring concrete.
Tire foundation
A unique and at the same time strong foundation with your own hands can be built from car tires. This is an economical version of the base for a wooden structure made of logs or sleepers. The method of bookmarking the elements is as follows: marking is made for the outline of the bath. Then the top layer of the earth is removed, along the entire perimeter, 15 cm deep and 50 cm wide. The space is covered with rubble and sand mixed in a ratio of 1: 1. The pillow is rammed under the tires by hand tamper.
The required number of tires about 20-25 pieces of the same size and height is prepared (it all depends on the size of the tires and the bath). The perimeter of the tires is laid out so that they lie tightly to each other.
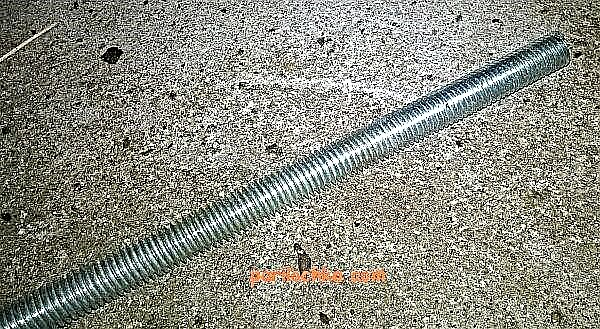
Now insert the threaded rods, tie them to the fittings threaded through the tires. We will fasten the supporting structure from them to sleepers, timber. The depth of the studs should be the entire thickness of the tires. The height of such anchors should be at least 250 mm so that the supporting beam for the log house or sleepers can be screwed on.
It is advisable to throw reinforcement around the entire perimeter and diagonally, and then fill the tire space itself. Reinforcement can be carried out directly through the body of tires, by drilling holes and threading reinforcement across the entire perimeter, so there is no need to conduct strapping from the outside with a channel or a corner.
You can make a set of blocks of tires and bury them directly in the ground. At the same time, the construction price will noticeably decrease; there is no need to pour a large slab for building a building from foam blocks or expanded clay concrete blocks.The device of load-bearing elements from tires is one of the cheap and simple options, which is not inferior in quality to the slab. This is an ideal foundation for a bath of timber, sleepers or for a solid wooden house (log house).
You can use the block version of the foundation of tires, where the marking is carried out in the same way as in other cases, but you do not need any pipes, piles, concrete blocks, and spend expensive reinforcement.
A set of tires (4−5 pcs.), Set on top of each other, will serve as a support for the log house or sleepers, instead of pipes and formwork. The terms of erection of such supports are minimal, the foundation of the tires dries quickly, since there is no large volume of concrete in the ground and after a couple of days you can carry out further installation of the frame bath or the installation of a wooden log house.
Repair wooden base
Sometimes the foundation for the bath is prepared from a thick beam, concreted directly into the ground, and sometimes a monolithic version is equipped. You need to know some little things before you properly repair the foundation of the bathhouse or build a new foundation under the bathhouse with your own hands:
- For example, a wooden structure made of sleepers or a log house is pulled together outside by brackets in the places of their subsidence. How to pull up the blockhouse, how many braces you need, you can calculate. With other foundations a little more complicated. You need to know how much the concrete dries, and only then mount the blockhouse or beams. If the bearing blocks burst during installation and their height is small, it is possible to pour a reinforcing layer of concrete around the blocks, filling in with all the cracks formed in the column.
- Having decided to make the foundation of the bath yourself, you will not only save considerable money, but also get a good experience. It is not difficult to build a monolithic or any other foundation with your own hands, you just need to go through all the stages of construction in turn and not violate the technology.
- Make the right calculation, marking for construction, excavation, reinforcement, insulation. Do all the necessary waterproofing work. Consultation with builders (developers) who build this type of foundation for a long time and have good experience will not be out of place.
Make a decision, from what material to build the foundation, from a log house, sleepers, what will be the height of the building, how many sleepers or timber. Whether a monolithic or concrete foundation is needed for a log house, wooden from sleepers or a solid foundation for a construction from foam blocks.
Knowing how to make a foundation for a bath is not all, preliminary calculations need to be done, and only then can it be started with confidence. Which foundation is better for the bath is up to you to decide, but how much materials will be needed to calculate it in advance and draw its structure. After a simple calculation, you can do everything perfectly, because heavy equipment is not needed here, except for a concrete mixer with a wooden gutter and a drain for concrete.
The foundation for a 3x5 bathhouse with your own hands: step-by-step instructions
Russian real bath - what could be better for the body and for the soul? There is no person who would be indifferent to her.  However, for each of us it is something special: relax, get together in a friendly friendly company, warm ourselves with a broom, etc.
At the same time, the builder may even be one who has not previously been engaged in activities of this kind, since the procedure is very simple. There is a lot of useful information on the World Wide Web with which you can perform the task technically correctly. Let’s take a look at how to do the foundation for a 3x5 bathhouse with your own hands.
Choose a plot
A huge role in the construction is played by the choice of the site. This stage must be approached responsibly, since the life of the object will largely depend on what surface it is on.
The plot should be relatively flat. There should not be any boulders, stumps and other things. You must also calculate its size in advance. As for our case, we adhere to the size of 3x5.But keep in mind, the bath itself should have 3x3 meters and 2x3 - a dressing room.
Consider possible landslides, subsidence, slope, etc. A sandy soil would be an ideal solution, as it does not sag, practically does not move, so a shallow foundation can be made.
If you are going to carry out construction on clay or chernozem soil, then do the depth no higher than the level of freezing of the soil. This is about twenty centimeters. Do not forget to lay a sand cushion, which can protect against movements that are observed during frost heaving.
It is good if the site has a slight slope, necessary for the drain of melt and rainwater. It can be in any direction, with the exception of only the north.
Preliminary work
Before starting work, it is recommended to level the site, removing the topsoil from it, using a long cord for this purpose. Make drawings and markup.
Important! Do not forget that the width of the foundation should be ten centimeters larger than the wall. Marking accuracy must be checked using a right triangle and level.
The base is also of great importance. However, given the fact that the structure is not heavy, you can do without a strip foundation, choosing in favor of small supports. In the corners, it is necessary to build boxes that are needed to fill the pillars.
You can do all the work yourself or use the help of specialists. Their prices are different and depend on the level of skill of the person, his work experience and labor assessment.
Construction of the bath
After the cement mixture has hardened, we lay out the roofing material (pieces fit), thanks to them, the moisture and moisture from the foundation on the walls of the building will be much less.
Building the foundations for a 3x5 bathhouse with our own hands, we lay out the basement row on the roofing material, using not pieces in length, but a solid bar, and in width - we use its pieces of the required length. Be sure to make cuts at the ends of the material. This is necessary for overlapping joints.
The subsequent rows need to be laid out without a dressing room. Then cut off the necessary pieces of the bars you used and carefully fill their ends. On each row we lay the tape necessary for wall insulation. If you don’t have jute, use moss.
We lay a solid bar through each three or four rows to prevent the wall from moving away. Then all the bars in the opening need to be cut. The last row, as well as the first, is laid out from a solid bar, supports are made.
Internal work
Before you begin the internal work, you need to decide exactly how you want it to look. Someone performs it in one single restrained style, while someone prefers a simpler solution, trying to save a little on this.
We collect the floor and ceiling from the board, which has a width of about forty millimeters. It should be borne in mind the fact that the floors must be done regardless of the walls of the building.
[content-egg module = GdeSlon template = compare]
Formwork installation and solution preparation
Formwork is a frame made of boards and beams that will become holding walls for the foundation. Boards must be tightly fitted to each other to avoid leakage of the poured solution. When installing, the formwork must be cleaned and moistened with water. The solution inside the formwork is poured in layers of 15 cm, each of which is rammed and leveled. Concrete mortar pouring should be carried out in hot sunny weather, avoiding rain and damp.
In the preparation of the solution, the quality of the constituent components is very important. Sand and gravel should be dried and cleaned of earth, clay and debris. Do not save on cement quality! The ratio of components in the solution should be 6 parts of gravel to 4 parts of sand, the amount of water - not higher than 75% by weight of cement.
The mixture is prepared in the following sequence:
For extra strength, it is recommended to install a frame made of reinforcing bars laid along and across.

Building the foundation of the slab type
For a slab foundation, first of all, it is necessary to create a slab of reinforced concrete with a thickness of about 30 cm, corresponding to the perimeter of the bathhouse under construction.
In case the clay soil is on the site, it should be fixed with sand and gravel. To do this, marking the perimeter of the future building, dig a pit 1.5 m deep, extract clay and fill the place with gravel or sand, carefully tamping the material. If the soil is sandy, then it is enough to remove only the topsoil and replace it with sand. Level the surface with a level - there should be no slopes. Mark the future construction, strictly adhering to the perpendicularity of the sides.
The next step is the installation of formwork. Since you are making a monolithic slab, the requirements for the rigidity of the formwork design will be higher than when installing a strip foundation, since the load is much higher. Therefore, during installation, it will not be superfluous to use additional supports.
Stage Three: Waterproofing. As such, it is convenient to use a dense plastic film. Before laying it, it is necessary to provide surfaces with sufficient density. To do this, sprinkle cement on the sand inside the formwork at the rate of 50 kg per 10 square meters, mix thoroughly with a rake to a shallow depth (4 cm will be enough) and pour over water. After hardening, put the film.
Next, prepare the fittings. A suitable option for strength and weight would be bars with a diameter of 14 mm. The length of the valve must be shorter than the installation site by 10 cm: this will protect the rods from contact with the environment and corrosion. The fittings should be laid with a lattice, providing a cage of 15-20 cm in size, and twisted with a steel wire with a diameter of about 2 mm, or nylon ties. There should be two such grids, one above the other. Leave a distance of 20 cm between the lower and upper, while lowering the lower one above the waterproofing layer by 5 cm. During concreting, the upper grille should be recessed by 5 cm. Accordingly, the height of the slab will be 30 cm.
Practical advice to topics. who wants to build a bath with their own hands: what type of foundation to choose based on the type of soil on the site, how to properly build the foundation.
DIY foundation for a bath: Step-by-step instructions
To build a bathhouse is the first desire of most owners of private houses. But before construction, questions arise: from what material to build, what foundation should be made, etc. If you decide to mount the foundation for the bath yourself, this article will become an assistant and tell you in detail how to do it right.
Types of foundations under the bath
The bathhouse is a lightweight design, but there are two-story buildings, you need to choose the foundation individually for each building, starting from the indicators:
- Massive bath
- The specifics of surveying in the construction area.
- The material from which the bath will be collected.
- Monolithic. This is mounted on floating soil with high-lying hot water (groundwater).
- Column or pile screw. It is used for wooden baths made of timber or logs suitable for sandy soil.
- Tape. The most common option, used on soil with a deep bed of GW.
- Mixed type (tape + pile). They are rarely used for baths, suitable for soils with quicksand, high bedding.
Depending on the material used, the foundation of the bathhouse may consist of:
- made of brick
- concrete
- from blocks
- jellied or screw piles.
 The foundation for the bath is in most cases lightweight, then the installation is done by hand.Of course, there are companies engaged in the construction of turnkey baths at a price of 10,000 m2, but in order to save money, it is easier to do the work yourself. How to make a foundation for a bath of various types, we will talk below.
DIY installation of the base under the bath
Each of the listed types of foundation for a bath has its own characteristics, they need to be considered separately. The only thing that unites the work is the choice of a place for construction, the preparation of a project plan.
How to choose the right place for a bath bookmark
The choice of place for the construction of the bath should be taken seriously. The design is not built for one year, it should be located correctly. There are several types of location of the bathhouse: an extension to the main house, a separate bathhouse. If the bathhouse is an extension to a residential building, the foundation to it is carried out similarly to the main one with reference. Do not make screw piles when the main house is on a strip foundation.
A freestanding bathhouse means choosing a place away from trees and other plantings. The bath will be heated, smoke, sparks are not useful to fruit trees.
 Why is a project needed?
Do-it-yourself bath construction requires prior planning. Regardless of whether the building will be registered in the future or not. The easiest way to use a standard project, there are many of them can be found on the network. Photos are attached to any of the standard projects. Photos are needed to understand and present the construction in more detail.
Planning also includes an estimate where all costs and necessary material are calculated in order to start building the foundation under the bathhouse with your own hands.
Installation of a strip foundation
 The strip foundation for the construction of a bath with your own hands can be done in several ways. The future platform is preliminarily marked on the site, a trench is dug through it to a depth of more than 50 cm, 4-5 cm wider than the expected masonry of brick or timber. It is better to dig a trench in summer when groundwater has the lowest occurrence level. The progress of subsequent work depends on the option selected:
- A pillow is made of gravel and coarse sand. Each layer is rammed, should have a thickness of 15 cm. You can use the finished mixture of ASG, but it costs more. For better compaction, sand is recommended to be shed with water. A liquid cement mortar is made (it should resemble sour cream), spilled on a sand pad. A brick or rubble stone is mounted on the base. It will be a brick base mounted with a brick. Between every second row, a masonry net is laid. Waterproofing roofing material (2 layers).
- Another way starts with filling the pillow from ASG to half, rammed in exactly the same way as in the first case. It is important that the surface of the pillow is aligned. The next step is laid in one row brick. After they mount the formwork from boards and timber 40x40 mm. The height of the formwork is more than 40 cm. Concrete based on moisture-resistant cement is poured into it.
- The method is used for dense soil. The formwork is installed from a dense material and timber, for example slate. Lay slate sheets need overlapping 8-10 cm for tight formwork. Sand is poured into the formwork, which is tamped. The next layer is covered with gravel on a half-dug trench. The seal design is flooded. After they begin to pour concrete. The concrete layer should be no more than 150 mm. Concrete should be poured before the appearance of a cement slurry on the surface.
 For uniform drying, the foundation is covered with sawdust, burlap on top, even a PVC film is suitable. Once in essence, the structure is unwound and watered again with water. So, it should stand under isolation for three days. Then the foundation under the bathhouse is opened, it is allowed to dry completely, settle down. The minimum drying period is 2-3 days. After it can be covered with waterproofing, for example, roofing material in two layers.
For the construction of the foundation for a strip-type bathhouse, several factors must be taken into account:
- The height of the fill above the ground should be 20–40 cm. It depends on the level of HS and the material from which the walls are assembled, so for a bath from a beam, the height of the base should be greater, since the tree does not like moisture.
- Silicate brick is not suitable for the construction of the foundation, over time it is destroyed by moisture. Red ceramic is made at high temperatures and humidity is not afraid of him.
- The tape has a width of 25-50 cm and depends on the material from which they will build a bath.
- Concrete can be purchased ready-made, but it will be cheaper to make it yourself.
- sand (preferably coarse-grained, it is pre-cleaned) 5% moisture - 1150 kg,
- Portland cement (moisture resistant) - 400-500 kg,
- crushed stone (small or medium) - 1800-200 kg,
- water - 170-175 l
You can also calculate the amount of concrete on the foundation of the bath yourself. For example, a strip foundation with a height of 0.3 m and a length of 19 m contains 0.3x0.3x19 = 1.71 m3. Similarly, you can calculate any volume. But it is necessary to additionally take into account that a foundation is also needed for the stove, therefore, a supply of 0.3 m3 must be added to the resulting volume.
Installation of the column foundation
 The simplest type of foundation for a bath of timber, chopped or logs. A good option for any type of soil, especially in hilly areas.
The design consists of pillars, which are located at the corners of the future bath, under all the bearing walls. The distance between the posts is a maximum of 2 m.
It is not difficult to make a column foundation with your own hands, you can use it:
- wooden or metal, asbestos pillars,
- brick posts laid out,
- flooded piles
- screw posts.
An inexpensive option is wooden poles, but they must be dried and treated with tar or an antiseptic of deep penetration, such as Senezh, before use. For a columnar foundation made of wood, it is better to use larch or aspen, as these wood species are not afraid of water and get wet, they only become stronger. Set in pre-drilled holes where sand or ASG is poured, fixed with concrete pouring.
 Brick columns are the most time-consuming type of foundation with your own hands for a bath. But making an effort with this work can be done. A similar circuit can be seen in the figure.
The location of the posts is marked, the top layer of soil is removed and a hole is dug, 10-20 cm wider than the future pillars in diameter. A sand cushion of at least 15 cm is laid. A column of bricks in two rows is mounted on top.
Do-it-yourself concrete piles are mounted most often, since the work, although laborious, does not require special skill. Drill wells with a depth of at least 1.5 m and a diameter of at least 250 mm. In the holes lay the connected frames from the reinforcement. They are knitted in advance from reinforced rods of 3 pieces, short connecting and knitting wires. The structure is poured with concrete. A brick column is laid on top of the pile.
You can simplify this design by taking an asbestos pipe with a cross section of 200 mm and install them in the wells. Concrete is poured into the pipe. The gap between the pipe wall and the well is filled with clay or gravel and rammed.
Concrete should be poured into the pipe gradually. The first time the filling is carried out at ⅓, since after that the pipes will slightly raise. The second stage is filled with another ⅓ part and the iron reinforcement is inserted inside. Only after that the rest is poured. Such a foundation dries completely in 5-7 days.
Another option for pillars is screw piles. They are sold prefabricated and have blades. They are screwed into the ground with the help of a bar. The only negative is that it is impossible to do the work alone with your own hands. It can be screwed to various depths, which is good for uneven surfaces.
Installation of a monolithic foundation under the bath
 The type of foundation is used for any soil, but most often if there is a swimmer.The design is expensive, but the pressure on the soil is evenly distributed and the bath does not warp over time. There is no need to install a separate pillow and foundation under the stove. The structure is either poured with concrete on a mounted frame made of reinforcement, or ready-made reinforced concrete slabs are used.
Do-it-yourself installation of a monolithic foundation for a bathhouse is carried out in stages:
- Digging a trench to the width of the foundation and a depth of 80-60 cm.
- A pillow of sand and gravel 15 cm is poured at the bottom.
- Waterproofing, for example, roofing material is reinforced. Layers can be 2-3, the main thing is that there are no open areas, overlapping 10-15 cm.
- Then the formwork and reinforced encircling are done, which are again poured with concrete.
- It is important to think about where to drain and install the pipe after solidification before pouring, it will be more difficult to do this.
Only the owner can choose the right foundation option. It is necessary to build on this moment from one's strengths and material capabilities.
[content-egg module = GdeSlon template = compare]
Do-it-yourself ribbon foundation for a bath, step by step instructions
 An integral part of any building, including a bath, is the foundation. The principle of pouring the foundation is no different from laying the foundation for a residential building. The category of the foundation for the bath is determined based on the following factors:
- The load on the land. In most cases, the bathhouse is an oversized building. Naturally, the load from its design will be less, and this means that there is no need to lay too massive a foundation.
- Features of the soil. The soil beneath the building may be heaving, or slightly foul. The groundwater level may be deep, or lie close to the surface of the ground. The soil is sandy, clayey, chernozem, and so on. Each of them contributes to a certain coefficient of shrinkage of the building. This should be taken into account when determining which foundation to fill.
Before you familiarize yourself with the step-by-step instructions for filling the foundation for a bath with your own hands, you need to consider the features of the main types of substrates that are used in this case.
Phased work
It was time to do the foundation work under the bathhouse with your own hands. Step-by-step instructions describe the following work:
- Choice of a place for filling.
- Site preparation.
- Digging a trench.
- Concrete works.
Before starting the preparatory work, it is necessary to have on hand a project for the future bath. This is necessary in order to accurately determine what size the foundation should be, even if all the work will be done on their own (without using the services of the construction team).
The bathhouse can be a separate one, or an extension to the main building. Wooden arbors cannot be placed near it (a spark can cause them to ignite). The building should stand at a distance from fruit trees (smoke will harm their branches, foliage and fruits). Compliance with this rule ensures fire safety during the operation of the building.
If the building design allows you to build it near the house, then the foundations of both buildings should be identical. In the case of a separate bath, its foundation can be of any structure (tape, slab, etc.).
The next stage is the preparation of the site for earthworks. If a tree grew in the place where the building will be located, be sure to remove the entire root system so that it does not grow inside the building, or does not destroy its base. Useful soil can be removed beforehand. It can be used for backfilling in flower beds, or for planning lawns. During concrete work, cement slurry can damage the fertile soil layer. Therefore, they should be carried out as close as possible to the building itself (ideally, inside the future room).
Earthwork is a very important preparatory process before filling the foundation with your own hands. At this stage, it is necessary to know the depth and width of the future foundation.In most cases, a shallow tape monolith is sufficient.
 Foundation trench
The walls of the trench will serve as the formwork. Therefore, they should be as even as possible (in order to avoid overspending of the material). During the execution of the work, the land can be thrown inside the future building. This will make it easier to level and level the floor. One of the most important elements of the foundation of any building is bedding. Sand is mainly used for this.
It should be well compacted (by a vibrating plate, or a vibro-paw). If the terrain is characterized by a high level of groundwater, then at this stage it is necessary to take care of waterproofing. In the old days, under the tape foundations, a layer of clay was poured and strongly compacted. Then a small layer of liquid clay was poured. After she stood, they carried out concrete work. This is the cheapest waterproofing option. But today, inexpensive materials are on sale that are ideal for protecting the base of a building from groundwater.
The final stage of the preparatory work is the installation of formwork for the strip foundation, or basement. For convenience in pouring the monolith, its height should correspond to the level of the future foundation for the bath.
Each type of foundation requires its own procedures. Therefore, further in a step-by-step instruction for pouring the foundation of the bathhouse, each type of foundation will be described separately with its own hands.
The concrete grade for such work should be no less than M200 (220 liters of water, 324 kilograms of cement grade 400/500, 1296 kg. Sand, and 1296 kilograms of crushed stone of fraction 10 are taken per cubic meter of the mixture). It is imperative to reinforce the monolith layer so that it is stronger. For this, fittings with a diameter of one centimeter are enough.
The strip foundation is used on dense ground. If the earth is not prone to heaving, such a foundation will be enough to withstand the construction of the building. Choosing this method, you need to consider that its use is permissible only on relatively flat areas. The depth of the trench should be 20, 40, or 60 centimeters. You can dig it out yourself without using an excavator. At the bottom of the trench, a bed of sand is made, compacted. Its thickness is 20 centimeters.
Then the frame of the reinforcement is connected. It must be placed on small stones so that after pouring it is completely in the monolith. After the waterproofing has been laid, the armored belt and formwork are mounted, concrete can be poured. To do the work yourself, the mortar is prepared in the following proportion: two buckets of sand are taken on a bucket of cement, and three buckets of gravel.
The tape version must be firmly tied with rods. At the corners, a piece of reinforcement should be bent in half, and not bandaged with another rod. The strength of the monolith will depend on this.
Unlike tape monolith, this type of base is easier to do with your own hands. For this, during the preparatory phase, a shallow trench breaks out (this will be the bottom of the basement). Then a 1.3 meter deep well is drilled. At its bottom, sand is poured (thickness 30 centimeters), and compacted. After that, the frame from the reinforcement is connected, and placed in the well.
Do not immediately fill the entire cavity of the well, otherwise voids will form in the concrete at this depth. To avoid such difficulties, concrete should be poured gradually followed by compaction with a vibrating finger. This support should be left to harden for about a week. After this, the columns can be connected to each other, installing bars, or channels. If the support is unevenly poured, you must not try to pull it out so that it can be installed correctly later. To align the support, it is necessary to cut off the upper part of the column, bringing it under the level.
Such a base for a bath is used in the case of a high level of groundwater, or in the presence of floaters. During the preparatory work, the entire area where the building will stand is cleared.The thickness of the soil corresponding to the thickness of the monolithic slab is removed. At the bottom of the trough, sand is poured and compacted. Then the waterproofing film is lined.
After that, the frame of the reinforcement is connected. To make it easier to do this work with your own hands, at first two nets are knitted with a cell of 30-40 centimeters. The first is placed on supports (so that it does not lie on the sand) at the bottom of the pit. The second grid is mounted above it at a distance of 15 centimeters using reinforcing bars. Fix these elements with a flexible knitting wire. Watch the video how to make a slab foundation for a bathhouse.
After performing such work, the entire plane is poured with concrete. A feature of such a foundation is that the weight of the building is distributed over the entire land. Therefore, it does not sag, even if the bath is built on unsteady soils.
Regardless of the type of foundation, whether tape, slab or any other - before pouring the monolith across the structure, you need to place a plastic pipe filled with sand. This mortgage will allow to bring sanitary communications into the building of the bathhouse.
[content-egg module = GdeSlon template = compare]
Preparing for the construction of the bath
Before the time when the bath will be suitable for use, a lot of time will pass. The most time-consuming is the foundation stage. It takes from 3 months to a year.
The main stages of construction:
- Development of a drawing of the structure and layout on the site.
- Procurement of materials and preparation of tools.
- Foundation construction.
- The construction of walls, the installation of windows, doors, stoves.
- Roofing.
- Interior decoration of the bath.
The foundation, as the basis of the future construction, requires a responsible approach to the selection of the site, materials and quality of construction work.
What type of foundation to choose
Depending on the type of soil on the site, a decision is made about which foundation to erect, at what depth to deepen.
The main types of foundations for the bath:
- pile - used on uneven surfaces with a large difference in height, when there is a danger of flooding,
- tape - the most common type used on flat areas and on most types of soils,
- tiled - suitable for heaving soils, wetlands.
Information about what kind of soil is present on the site for the construction of the bath is known through geodetic studies. Or dig a hole with a depth below the freezing point (about 2-2.5 m) and determine the soil composition from the layers.


What to make the foundation of the bath
The strip foundation, as the most common type of base, can be:
A monolithic structure based on reinforcing mesh and concrete is the most durable, withstands high loads. Block and brick gives savings of up to 20%, but is not suitable for construction on heaving soils.
On soils where sand and clay predominate, install a tiled foundation. This will help to avoid deformation of the walls and roof of the bath due to natural swelling of the soil.
For the construction of the strip foundation you will need:
- concrete mixture of water, cement, river sand, gravel,
- granite crushed stone of 10-20 mm fraction, brand not lower than 400,
- fittings,
- wire,
- formwork material - wooden boards, chipboard,
- nails
- roofing material or PET film,
- pipes for perfumes and drains,
- sand and fine gravel for a pillow,
- old metal buckets, beams, pipes, stones, pieces of concrete - to save materials and strengthen the foundation.
Step-by-step instruction: strip foundation for a bath
The main stages of work in the construction of the foundation for the bath:
- Preparation of the site for the bath. Markup.
- Digging a trench. Laying pillows.
- Formwork and trench reinforcement.
- Concrete pouring.
- The final stage of work: dismantling the formwork and sprinkling the foundation with soil.
Preparation of the site for the bath
Remove from the site that is intended for the construction of the bath, garbage, dry grass and leaves.If trees and shrubs grew here, remove the roots completely.
If the platform is uneven, you will need to fill the pits or cut off the protruding parts. On a site with a significant difference in elevations, a pile foundation is mainly installed. With a slight difference in height, the base is made according to the level in the horizontal plane.
Fertile soil with grass and roots is removed from the foundation site. Usually, 10-15 cm of the topsoil is removed for this. At the same time, from all sides the land is cleared another 0.5-1 m. So, the site will be slightly larger than the design size of the foundation.
Preparing the trench for the bath
Mark the future foundation. To do this, drive in metal rods at the 4 corners of the future bath. Pull the kapron thread around the perimeter, output the level horizontally, fix it. Measure the estimated width of the foundation and drive into the inner corners of another 4 rods. Pull the thread, bring the level, lock. Check the correct installation of the rods and the tension of the cord: measure the diagonals. If the angles are brought out at 90 degrees, the diagonals will be the same in length.
Dig a trench, focusing on the thread. Trench depth: + 20 ... 30 cm to the freezing depth of the soil (deep foundation), up to 60 cm (shallow). The bottom is leveled using a level.
Lay a pillow at the bottom of the finished trench. To do this, pour fine sand evenly with a layer of a thickness of 15-20 cm. Flatten and pour. Compact wet sand using a rammer. This work can be done using a heavy bar with handles.

Formwork and foundation reinforcement
Before installing the formwork at the bottom of the trench, lay a layer of broken brick, coarse gravel on the sand. This is done so that the metal frame of the foundation does not touch the pillow. Sand is a porous, well-retaining and moisture-giving building material. Therefore, with constant interaction, the reinforcement rots and collapses.
Prepare the formwork: make boards of unedged boards and chipboard, knock down with nails, connect with screws, connect with wire. The height of the frame is 45 cm above the level of the trench.
Foundation formwork is a temporary framework for liquid concrete. Therefore, fasten the boards in such a way that, without prejudice to the base, remove them after the mortar has set.
For reinforcement, use metal rods and wire to tie them together. Welding in this case is not the best solution, since corrosion will primarily affect welded surfaces.

Frame reinforcement should be uniform. A common laying option is two rods along the trench and the installation of vertical metal pins on both sides of the trench every 20-30 cm. At the intersections of the reinforcement, a knot of wire is made. Finish the metal frame with two rods mounted on the vertical pins at the top. To save on concrete and strengthen the foundation, any metal products are added to the frame: old buckets, agricultural tools, channels, wire residues, scrap.
It is impossible to use non-ferrous metals, products containing lead, radioactive substances in the foundation.
For pouring the foundation, a mixture of sand, cement, gravel, water is prepared. Proportions of concrete:
- 1 part sand
- 1 part cement
- 1.5 parts of gravel
- the mass of water is at least 60% of the total mixture.
- cement grade not lower than M-200 - in warm weather,
- not lower than M-400 - in the cold.
In summer, the water is cooled in the heat so that the concrete hardens evenly. On the contrary, in the cold season, the mixture for pouring the foundation is prepared in warm water.
Concrete mixture is poured directly into the metal frame. In order to evenly distribute the liquid mass in the formwork and remove air bubbles, periodically make holes with a shovel, crowbar, metal rods. Instead, special vibrators are often used. The less air remains inside the foundation, the stronger and more reliable the base of the bath will be.
Land, branches, organic waste, and other chemicals are not allowed to enter the concrete mixture.

Concrete shrinkage occurs within 3-12 months. It depends on weather conditions, the consistency of the mixture, the brand of cement, the quality of the fill. After preliminary solidification of the foundation, the formwork is removed (after 3-7 days).
The cavities in the trench left over from the wooden shields are covered with rubble and soil. For drainage of groundwater, a drainage is arranged: special perforated pipes are laid to the bottom along the perimeter of the foundation and brought to the site.
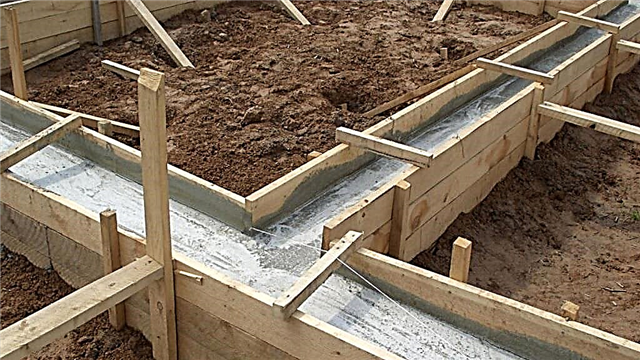
After creating a reliable foundation within 7-30 days, an experienced builder will finish the bath and turn it over. The construction of walls, roofs, interior decoration, the installation of windows, doors, stoves - these stages occur much faster than pouring the foundation. However, each of them requires certain skills and the attraction of additional labor. If you can cope with the foundation with your own hands alone, then at least two will be required to lay the roof. To install the furnace, ventilation, chimney, an experienced stove-maker will be required, and a good carpenter will help to complete the interior decoration of the bath with natural wood.
[content-egg module = GdeSlon template = compare]
Do it yourself: how to make a foundation for a bath? Step-by-step instructions here.
 A bathhouse is not such a responsible building as a residential building, for example, therefore many decide to install it on their own. Of course, this requires some building knowledge, without which even a simple bathhouse will not be built at all or will not stand idle for a long time.
But a construction university for such a task is still not needed. The most difficult, responsible and expensive in the bathhouse is the foundation. About how to do without outside help when laying it, how to do it, fill it and it will be discussed in this article.
The foundation under the bathhouse with your own hands: what will its walls be of?
The load on the future foundation depends on the material of the walls. We believe that if the owner of the site decided to build on his own, then he will prefer the cheapest option. The column foundation will be the cheapest for the bath, which does not fit only brick and those soils that push and tilt the pillars directly in the ground - these are weak soils (peat bogs, for example) or heavily downhill (clay). Let's first figure out what foundation is suitable for a particular bath, and then there will be instructions for their laying.
For a bath from a felling, a bar
Any foundation is suitable for a bathhouse from a log house and a barbecause wood is not the hardest material. You can supply both tape, and columnar, and plate as necessary.
We have a whole article in which the criteria for choosing the best foundation for a bath from a timber or a log are examined in detail.
Foundation for a bath of blocks, do-it-yourself bricks
If the bath is supposed to be built from blocks (and the foam block and brick belong to this category), then the main difference between them will be the mass of a cubic meter. Say popular cellular concrete is the lightest, cinder blocks are much heavier, and brick follows the cinder block by weight. Therefore, the foundation for a bath of foam blocks should not only reckon with the features of the soil, but also with the weight of the future structure.
If there is no desire to spend time and energy on additional work (construction of trowels, laying of strapping beams), then it is better to prefer a strip foundation - simple and reliable. Incidentally, it is suitable for both light and heavy blocks. A brick bath can be placed on a strip, slab and pile foundations.
The foundation for a do-it-yourself foam concrete bathhouse
The foam block is a demanding material in its own way (to the same waterproofing), but it has the least complaints regarding the foundation. A shallow strip or column foundation is suitable for him.with which the owner of the site will fully cope with his comrades. The instructions, as promised, are given below.We also recommend that you read the article about the foundations of foam block baths - types, depth and other details.
The foundation for a do-it-yourself frame bath
A frame bath is another example of a lightweight material for walls, which includes everything that has been said about foam blocks. The choice of foundation for a frame bath can be complicated by problematic soil, but in simple cases, when it comes to independent construction of the bath, it will be the same tape or columnar.
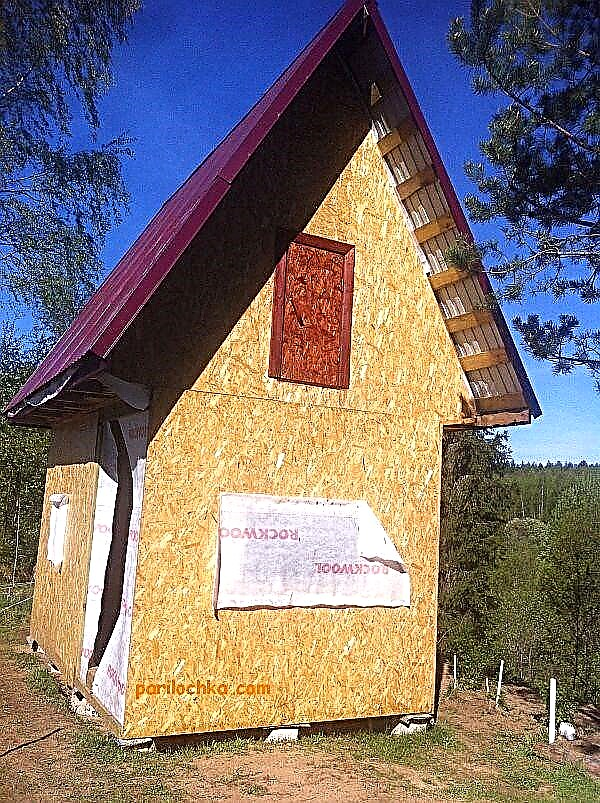
Frame sauna on concrete posts
DIY foundation for a bath: step-by-step instructions for its various types
Different types of foundations imply different technologies for their foundation. Let's consider each of them.
We also recommend that you familiarize yourself with the following nuances of bath foundations:
Do-it-yourself ribbon foundation for a bath

Tape can be shallow and with full depth. The difference between them is usually in the depth of freezing of the soil. That is, the sole of the first is 20 cm below the level of the fertile layer, and the second is the same 20 cm below the level of freezing in the area.
- Begin with geological exploration plot. Today, geologists also offer inexpensive (partial) options. From their conclusions depends on whether it is possible to make a shallow foundation. They will give the go-ahead if the soil is dry, inactive, with a small depth of freezing.
- Markup. Before embarking on it, you first need to clean the area and remove the fertile soil layer on the building site. Add to the cost of the foundation of the work of the bulldozer, if the bumps are large. The result should be a flat area, the height difference of which is checked by the hydraulic level.
- After that, using theodolite or the simplest knowledge of geometry, inner contour future bath. The lines are formed by building threads stretched between the pegs. Before moving to the outer contour, it is necessary to verify the lengths of the diagonals - they should be equal.
- Second (external) the outline is marked by the width of the foundation, which is equal to the thickness of future walls plus 10 cm.
- Last tagged internal partitions and foundation for the stove (if you decide to put a stone or iron stove).
- Trench. When digging a trench, you need to add 10 cm on each side - this is an increase for the future formwork. Of course, it’s easy to dig out the shallow foundation yourself, and with a considerable depth of laying, you may need a special technique that you have to hire. Add another 20 cm to the sand cushion. Incidentally, it is not worth saving on it; it is important for the future stability of the foundation.
- Formwork. Usually it is made of edged boards, which, by the way, after disassembly, can be used to create a roof battens or find another application. Instead of edged boards, it is permissible to use moisture-proof plywood.
The formwork is installed directly on the site. The minimum height of its walls above ground level is 30 cm. Try to hammer nails in one direction - this will facilitate later analysis of the structure. And in order for the formwork to stand motionless, you still need to make struts for the opposite shields.
Inside it is necessary to lay polyethylene and fix it on the sides of the formwork with a stapler.
5. Reinforcement. For it, steel rods with a diameter of 12 mm and preferably with an anti-corrosion coating are used. First of all, reinforcement rods are vertically driven into the bottom of the trench, which should be 5 cm below the formwork boards. They are driven in two rows, with a pitch of 50 cm and an indent from each side of 5 cm.
Horizontal rods are placed next, but they should not touch the bottom. The height above the bottom of the trench is 7-10 cm. For this, bricks are temporarily placed under them. Then the vertical and horizontal rods are connected by knitting wire.
The second row of horizontal rods should be 6-8 cm below the edge of the future foundation. For fastening, knitting wire is again used. (welding is not recommended).
6. Pouring. In most cases, it is recommended to take cement M-500. In winter, it is better not to fill the strip foundation, but if there is no other option, then you will have to add plasticizers to the concrete (liquid soap or dishwashing detergent in the amount of 200 ml per one mixer mixer), and then take care of the warming of the hardening concrete.
Solution recipe: cement (1 part), sand (3 parts), gravel medium and small (5 parts). Crushed stone fractions: 60-70% medium and 40-30% small.
Mix the ingredients dry first, then add water in an amount of 0.5 of the proportion of cement.
It is advisable to carry out the filling in one go. If it is not possible, then at least 20 cm of the solution should be poured.
Next stage - air forcing. To do this, bayonet (pierce with a piece of reinforcement) the solution and tap on the walls of the formwork. But it’s better to use a construction vibrator.
The formwork is removed after 3-7 days, and then the foundation is left for 3 weeks for final solidification. In the heat it needs to be watered with water 2-3 times a day and covered from the sun, in cold or rain - covered with a film. 28 days after pouring, the strip foundation for the bath will be ready for the erection of walls.
A dry foundation is needed immediately waterproof, for example, with bituminous mastic and roofing material.
DIY column foundation for a bath
A self-made columnar foundation for a bath can be of three types:
Let's start with the first one.

Pillars plunge into the ground one third or half of the depth to which the soil freezes. This is permissible only if it is placed on soils not prone to heaving and inactive, for example, on sand and gravel soil.
1. Cleaning the area and leveling the development spot. This item is the same as the tape (see above).
2. Markup. Pillars must be placed at maximum load points and evenly distributed between these points. Before starting the layout of the site, we draw something like this plan:

Then we transfer our plan to the site using building threads and pegs.
3. Excavation. An individual hole is dug under each pillar. You can work not only with a shovel, but also with a manual cone-shaped drill, which gives smooth edges. The hole in the ground will be larger than the diameter of the column - at least 10 cm, but everything is determined by the convenience of the future laying of pillars, in particular for brick, the space expands for the convenience of masonry. Walls should be made with slopes, expanding upward. Consider the following typical pillar sizes from different materials:
- brick or stone - 50x50 cm
- rubble stone - 60x60 cm
- asbestos cement pipe - 20 cm diameter,
- reinforced concrete support - 30-40 cm diameter,
- tree - 20 cm diameter.
The depth of the pit should be increased by the height of the sand-gravel pillow, which is usually 20 cm. The pillow should be shed with water and rammed before installing the pillars.
4. Post installation. Only one will be shown here. option with filling reinforced concrete pillar. In order to get acquainted with the other options, follow the link to the article, which provides more detailed information.
So, first, in the finished hole with a pillow is placed formwork, which can be made from a board of 40x150 mm, or from moisture-proof plywood.
The formwork is placed frame from rods 12-14 mm in diameter. Horizontal jumpers are made in increments of 20 cm. The height of the reinforcement above the grillage is 10 cm or more. For knitting fittings use a 6 mm wire.
Finally, concrete is poured. Do not fill it immediately, it is better in portions of 15-20 cm, followed by tamping of each layer.
5. Waterproofing. When the concrete hardens, it should be waterproofed with bitumen mastic and roofing felt.
6. Grillage. In the event that reinforced concrete beams will be used, the places of their joints should be strengthened additionally by welding the reinforcement trimmings.
Next, a new formwork is installed, a frame is placed in it and everything is poured with concrete M-300.
Ready grillage also needs waterproofing.
The space between the pillars is sealed with a blockage (brick or other wall).
The difference between this foundation and the previous one consists only in how deep the well is drilled under the future pillar. When fully laid for a columnar foundation, this is the depth of freezing of the soil plus 40 cm. And the technological steps do not differ from those described for shallow.
You can drill wells using a hand drill, a gas drill, or by hiring special equipment. It is up to the owner.
In this case, it is better to formwork in concrete pipes or plastic, if the required diameter is found. The well is drilled 10 cm wider than the casing.
1. First, the casing is inserted into the finished hole, the verticality of which you need to check.
2. Then, fittings are already placed in the pipe so that there is another 5 cm to the pipe walls.
3. The poured concrete should be thinner than for tape and contain more cement (2 shares instead of 1).
4. After pouring, it is worth using a construction vibrator to drive air out of concrete.
5. The space between the pipe and the walls of the borehole is covered with earth in layers and is rammed.
6. For two weeks, the concrete hardens, then the piles are aligned with a grinder (it must cut reinforcement too)
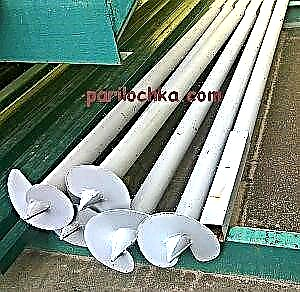
Pile foundation under the bathhouse with your own hands is also quite strong, in fact, it can be considered a kind of columnar. Only it is usually laid to a greater depth than the pillars - it is from 3 to 12 meters. The material of the piles may also be different.
- To lay the pile-screw foundation yourself, you need go through the same stages of preparationas for other species - clean and level the territory, mark the points where the piles will be laid.
- After that, in order to facilitate screwing the piles into the ground, digging leader holes to a depth of 15 cm with a diameter of 2-3 cm more than the blades.
- Holes are drilled in piles to insert the rods. After the rods are inserted, they become a rotary handle, like a corkscrew.
- Screw in the pile follows with a constant check of verticality. The depth of immersion should be below the level of freezing of the soil and reach the bearing layer.
- When all piles are screwed, you should outline a single level of them trimming. Piles are cut off by a grinder.
- After that, to the tops of the piles welded metal plates up to 1 cm thick, to which the grillage will be attached.
- The grillage can be welded or screwed bolts to the “hats” of piles.
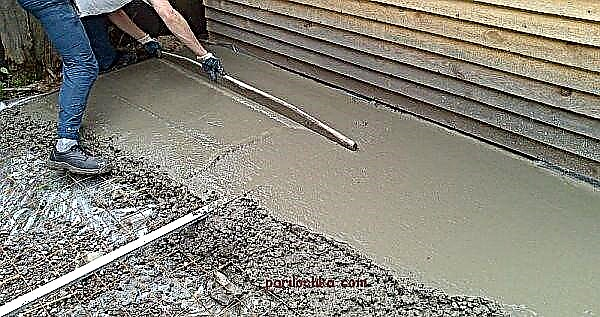
1. Clearing and leveling the territory. Removing fertile soil from a development spot.
2. Markup. Having outlined the dimensions of the future bath with construction thread and pegs, add 0.5-1 meter on each side - these will be the dimensions of the pit.
3. Sand and gravel pillow it is poured to the bottom of the pit with a layer of 15 to 30 cm, leveled, spilled with water and rammed.
4. Formwork. Removable formwork is done in the same way as for a strip foundation, but it is possible to make non-removable - from fiberboard plates. In this case, the plates are fastened with ties and corners. Like removable formwork, this one also needs to be strengthened by struts.
5. Waterproofing. Polyethylene or geotextiles are placed on a sand cushion. You can do with roofing material. It is important to make the joints of the material for waterproofing with a good overlap and close the formwork with them too.
6. Reinforcement. Small baths can be reinforced with a mesh made of 8-10 mm reinforcement. The mesh pitch is 10-15 cm. For heavier buildings, more durable reinforcement is needed - 12-14 mm. The same grid is made from it. With a large thickness of the foundation, you can reinforce several times.
7. Pouring. Better to fill in at a time. Pouring slowly, evenly. Vibrator compaction is mandatory.
In a month and a half, the foundation will be ready for the next stages of construction.But in the first weeks it needs to be watered with water so that the stove does not crack when dried.

The stove in the bathhouse also needs a solid foundation, and if the foundation of the bathhouse is not stovetop, then you need to think about a small foundation for the stove. However, there is a big difference whether your stove will be iron or brick. This is the difference in weight. Iron weighs a little - 300 pounds, for example. And brick - can weigh an order of magnitude more. Therefore, there is a rule: Strong foundations are needed for furnaces weighing more than 750 kg.
To calculate the weight of a brick furnace without mortar, you need to multiply the weight of a cubic meter of brick by the number of cubic meters:
1350 * V, where V is the volume in cubes.
Or, if it's easier, multiply the weight of one brick by their number. It is also necessary to add in excess of 40-50% per solution, and the weight of the furnace will be obtained.
There are different options for the implementation of the foundation under the oven with your own hands. In order not to talk about this too briefly, we suggest that you familiarize yourself with an article entirely devoted to this topic.
How to fill the foundation under the bath with your own hands
Above a couple of times we have already talked about all the stages of the work that precedes, accompanies the pouring and follows it. If this information was not enough, we recommend that you read a separate article in which filling is considered in detail.
DIY bath without foundation
Yes, there are those too. Such a bath can be put on rocky ground without any risk. In all other cases, in the definition of “without” there is some guile - there seems to be no foundation, but will have to strengthen the foundation. In similar quality can be used:
In the first case clay it fills trenches, as for a strip foundation, becoming a support for the walls.
For crushed stone you need to dig a pit and drainage trenches that divert water. But in the end, a reasonably strong and dry base is obtained, because roofing material or other waterproofing agent is placed on top of the gravel.
Sand and gravel form the very pillow that is laid under the foundation, but here it dispenses with the latter. It is made in the same way as from crushed stone.
Boulders - a wonderful foundation. But you have to dig a pit. Stones are laid out on its walls and fastened with cement mortar. Small stones are poured between the walls. A grillage is made on top.
[content-egg module = GdeSlon template = compare]
How to build a foundation for a bath
The maximum strength and stability of any building can be achieved only with a full foundation. No matter how the walls of the bath will be built, even a simple frame bath requires a foundation that holds the frame of the building securely. The more difficult the soil and the heavier the blocks, the deeper and wider the foundation of the foundation of the bath.

What foundation to choose for a bath
The simpler the design of the bath, the easier it is to solve the problem of how to build a foundation for the bath. For a small bath 3x4 or 4x5 m, the foundation built in two meters deep will be clearly excessive in strength and stability. A shallow concrete tape of 20 cm may not keep the design of the bath in balance. How to make a foundation for a bath right? A competent choice of sizes is determined by the type of soil and the load from the weight of the walls and the roof of the bath on a concrete tape. For different types and sizes of the bath, you can build a foundation using a typical solution:
In a bathhouse, as in any building, construction begins with the selection of a project and the attachment of a drawing made on the ground. This procedure allows you to determine how much the calculation of the bath coincides with the future dimensions on the site. After clarifying the place and orientation, they begin to study the composition of the soil on which it is supposed to build a bath.
This will help to drain from the base and open up near-surface groundwater sources, if any.Based on the results of the reconnaissance, they make a decision about the construction of the foundation for the construction, associate it with the building design and decide how to make the foundation for the bath easier, cheaper and faster.
The influence of soil and material of the walls of the bath on the design and dimensions of the foundation
Analysis of the composition of the soil at different depths is done according to standard methods by washing the samples with water. This approach is justified if you need to build a strong foundation for a three-story cottage, for a simple bath it will be enough to distinguish sandy loam and sand from clay with loam or rock.

Stony soils with a large number of fragments of stone of different fractions have the best bearing capacity. Most often, such soils are found at the places where basalt, limestone, chalk and calcite rocks come to the surface. Such a soil can easily withstand a load of 4-5 kg / cm 2. Next in strength are coarse-grained sands, they will withstand up to 3 kg / cm 2. The most common and least persistent are small loamy sand, clay and loam, able to withstand pressure up to a maximum of 2 kg / cm 2.
Choosing which foundation to build better
After the calculations, it is necessary to study the depth of soil freezing and the degree of water saturation. Both parameters are important for determining the depth at which the foundation needs to be built. If the supporting surface of the concrete frame is at a depth of freezing, and the soil is saturated with moisture, with the onset of frost, the wet rock will freeze and expand. In this case, a buoyant force will act on individual parts of the foundation frame. The magnitude of this force depends on the specific conditions, and in some cases can lead to serious damage to the building of the bath.
The simplest solution for waterlogged soils will be to use a pile or frame-pile type of foundation for a bath.
The pile foundation for the bath has certain advantages:
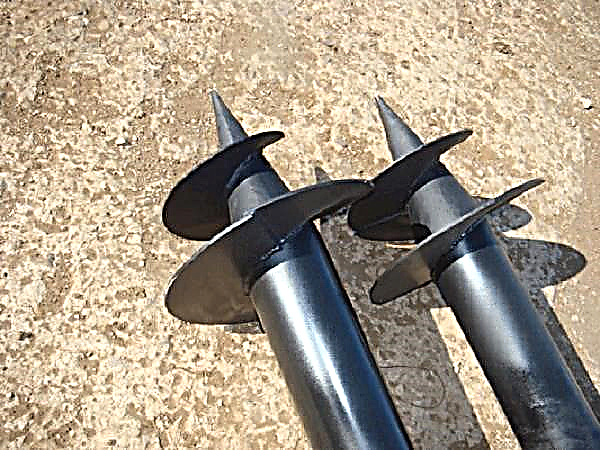
In addition, the pile option allows you to simply choose a place and lay out, cast the foundation under the heavy brick stove of the steam room of the bathhouse. The external walls of the concrete base cast under the furnace must be carefully waterproofed with a double layer of roofing material and mastic. The pile structure creates additional conditions for condensation to form on a concrete surface blown from all sides of the furnace support.
The marking of the installation points of the piles is carried out so that the piles are located at a distance of 90 cm - 110 cm under the walls and 100-150 cm inside the perimeter of the walls. Each pile is screwed to the depth of freezing of the soil plus 20 cm. The pile head is poured with concrete and cut off. After installing all the piles, the height of the supports above the ground is aligned horizontally with a cutter. The surface of the supports is carefully treated with waterproofing.

On the prepared supports, a frame of metal profile, channel or wooden beam with a cross section of 150x150 mm is laid. The made frame is sewn up with a board on which a layer of waterproofing and thermal insulation is laid. The foundation is ready, you can build a bathhouse. Most often, these types of pile foundations are used for building saunas made of timber, logs, prefabricated frame baths, but you can build a building from aerated concrete, arbolite stone, hollow ceramic bricks.

A kind of pile foundation is a columnar foundation.In this case, a sand and gravel mixture is poured around the steel pipe, poured with resin and a square section support is laid out from the brick. Such a column significantly increases the rigidity of the support of the bath. Sometimes steel tubular piles are concreted with an external casting of a cement-sand mixture. In this case, for each pipe, it is necessary to make the formwork and pour it with cement mortar.

Strip version of the foundation
The most simple and common is considered to be a strip foundation. To build a strip foundation, you need to correctly markup using a cord and pegs on all sides of the future frame. The width of the foundation tape is obtained by calculation, depending on the weight of the building. For a small bath, the width of the tape is taken in the size of a brick. So build cheaper and reduce concrete consumption. In this case, the lower part of the formwork reinforced with steel reinforcement is poured with concrete mortar. The thickness of the casting should be at least 30 cm. The rest of the trench is laid out either from rubble stone or from old ceramic bricks.

When marking, the width of the trench under the foundation is taken 10-15 cm wider than the estimated tape size. The depth of the trench for central Russia can be taken 90-120 cm. If the bath is on a hill, you can not do drainage for groundwater at the base of the foundation. Otherwise, it is necessary to lay a perforated plastic pipe with a small gradient at the bottom of the trench so that all groundwater flows along the drainage in the direction of the catchment, which is usually located on the north side of the building.
A mixture of fine gravel and sand is poured onto the surface of the drainage pipe and a layer of geotextile is laid. The laid mixture must be carefully aligned in height with a shovel and manual tamper. If you do not use a pipe, a layer of sand, geotextile fabric and large gravel are used as drainage. On top of the laid drainage, pieces of roofing material are cut out and pasted with mastic.
The next step is to install a wooden formwork. Most often, prefabricated prefabricated boards from a 20-30 mm board are used. The formwork is installed in the trench and fixed using struts and struts. The total thickness of the poured concrete under the foundation in the bath is at least 50 cm for weak clay and loamy soils. For stony ground, you can use the lightweight version with a pillow thickness of 20 cm and a brick trim protruding above the ground base. On the second or third day after the concrete has set, the formwork can be removed and waterproofed on the foundation surface.

The foundation for the furnace needs to be built in the form of a separate frame. The easiest way is to cast into a shallow trench a concrete slab filled with rubble stone, preferably large fragments, parts. A very good result is obtained when using an electric concrete compactor. 15-20 minutes of processing the poured mortar with gravel allows you to get very strong concrete even without the use of reinforcement. If desired, tape concrete can be processed in this way. But the work is quite laborious, so it’s easier and cheaper to build with the installation of fittings.
Slab foundation
In some cases, the features of the location of the bath, the nature of the soil, the presence of subsoil water do not make it possible to build a full strip foundation. In these cases, you can build a bath on the foundation in the form of a plate. The depth of such a foundation is very small, so the building of the bath will be quite stable and will not cause the rise of groundwater to the surface.

To form a solid foundation slab, it is necessary to build a support contour along the perimeter of the bath walls. A pit breaks out to a depth of 50-60 cm, which is sprinkled with gravel at least 15 cm thick. A layer of gravel is compacted with a manual or electric rammer.An intermediate layer of fine screening 3-4 cm thick is laid on the prepared crushed stone layer. Next, a waterproofing layer is laid and poured with concrete mortar. Instead of wooden formwork, the walls are laid with bricks. As a rule, a concrete slab is raised above the ground to a height of no more than half a brick due to the high consumption of cement mortar.
Such a foundation is very strong and can easily withstand the load of the weight of the walls of the heaviest rubble masonry, and it is not difficult to build it. Due to the high cost and high consumption of building materials, a stove for a bath is used in exceptional cases.
Conclusion
The light design of the bath allows you to build a building with minimal cost for foundation work. Any pouring of concrete in a strip foundation or in a tile foundation requires a break in the work for at least a month until the final set of strength. Therefore, it is best to build a bathhouse on a foundation of large-sized rubble stones in a solution with a setting accelerator.
How to build a foundation for a bath The maximum strength and stability of any building can be achieved only with a full foundation. No matter how the walls are built
How to make a foundation for a bath
It is unlikely that one can meet such an owner of a land plot who would not dream of his own bathhouse. The realization of this dream begins with laying the foundation for future construction. Without it, a reliable and long-term structure will not work. Therefore, the question of whether a foundation is needed for a bath should not even arise.

The base under the bath
Choosing the type of foundation
We will begin the work by determining what type of foundation suits us. It should be selected according to one of two criteria: by the type of soil and by the type used for the construction of the bathhouse building materials.
The type of soil can be determined as follows. In the place where the construction is planned, you need to dig a hole at least half a meter deep.
Then you need to carefully study the structure of the soil and draw the appropriate conclusions:
if the soil is garden, forest or liquefied land, then it is worth giving preference to a strip foundation. It will be located on a sand pillow,
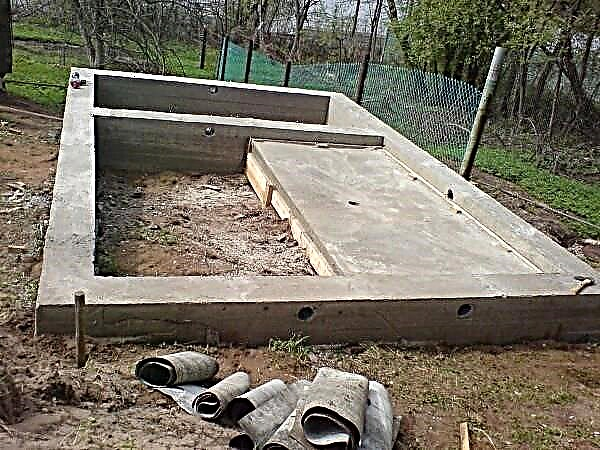
Let's say you found coarse sand, small gravel or clay - in this case, the optimal foundation for the bath is a strip or column base,

best of all, if fine sand, quartz or rocky rocks appear on the section of the recess - this means that you can use any kind of foundation.
No less important is the material from which you are going to build the bath:
Foundation process
Consider the process of creating a foundation for a bathhouse using an example of a strip structure. This is not the easiest foundation for a bath, but for some cases only it is suitable. So, let's start in order.

The first step from which our work will begin is to mark the place where this product will be located. Professionals do this with the help of a special device - theodolite.
But we can do without it and adopt another, simpler way. It is associated with the use of a cord and peg.
Advice! Before starting this work, carefully prepare the future construction site. Remove all rubbish from it, cut down the bush and mow the grass. If necessary, level the surface. These measures will help you facilitate and speed up your entire future workflow.
The markup is carried out as follows:
- we outline the line, which will be one of the sides of the foundation. On its edges we install stakes or trimming reinforcement. Pull the cord between them
- from the edges of this segment we measure two equal lines running at an angle of 90 °. These will be the transverse sides of our structure. Between them we also pull the twine
- then indent and again set the pegs and pull the cord. This indent defines the internal size of the base. If in the future it is planned to install a wooden log house, then the thickness of the foundation for the bath should be 40 centimeters. For walls of foam blocks or bricks, a base equal to 50 centimeters in cross section will be required,
- mark the location of the internal partitions of the building: they also need a foundation.
Advice! When marking the sides, keep in mind that the inner spacing should be 20 centimeters wider than the future foundation. This is due to the fact that in the prepared recesses there should be enough space to place the formwork.
Upon completion of this process, check the correct layout. To do this, measure the diagonals of the resulting rectangles.
Inside one shape, the diagonals must be equal. Otherwise, you need to check all the calculations and rearrange the stakes in the right place, so that the foundation for the bathhouse eventually gets the correct shape.

Having marked the site, proceed to digging trenches. It should be borne in mind that any land has differences in height.
Therefore, first, using the water level, we determine the lower point of the construction site. It is from her that the depth of the tape structure will be calculated.
The value of this parameter depends on the type of soil:
Having made the recesses, you need to create a sand cushion in them. To do this, pour a layer of sand with a thickness of 15 centimeters into the resulting ditches. It must be well leveled, watered and tamped.

To create a simple foundation for a simple bath will require formwork. It can be made from boards or thick plywood.
You can assemble this design directly at the construction site. Initially, individual shields are made. Then they are placed in trenches and connected to each other.
To do this, struts are beaten on the inside, and struts are fixed on the outside. These elements will help the formwork to maintain the desired shape after pouring concrete.
Advice! To prevent concrete from leaking through the cracks in the formwork and use polyethylene to prevent deformation of the boards. It needs to be fixed with the help of a construction stapler on the inside of wooden shields.
We also note the following point. If the manufacture of the foundation for the bath involves the use of ready-made concrete blocks, then, of course, no formwork will be required for them.

In the photo - reinforcement
The next step is to reinforce our future design. It is best to use rods with a thickness of 1.2 centimeters.
Instructions for this process will be as follows:
- drive into the ground at an angle of 90 degrees 2 rows of rods,
- place reinforcement segments at the bottom of the trench and tie them to the posts with wire,
- we mount the upper horizontal rows of reinforcement - we also do this using wire,
- we fasten the transverse jumpers - while the cell size of the resulting lattice should be equal to 30-35 centimeters.As for the distance from the reinforcement to the edges of the foundation, then it should be left at least 5 centimeters.
The strip base, like many other types of foundations for a bath, requires waterproofing. It can be performed in one of two ways: by pasting or using special additives to concrete.
The first option involves laying a layer of roofing material at the bottom of the structure and then coating the resulting foundation with mastic. The second method involves adding a special substance to the concrete solution, which will make the entire structure waterproofed. We recommend that you use this option because it is less labor intensive.

Formwork with concrete mortar poured into it
In the case of a strip base, the concrete grade for the foundation of the bath should be at least m400. The use of a lower brand is not allowed, since we are dealing with a supporting structure.
The composition of the mixture should be as follows:
The components are mixed, and water is added to them, after which the solution is brought to the desired consistency. Pour the mixture in layers of 20 centimeters each.
Advice! To remove air voids from concrete, after pouring it must be pierced with a stick in different places. To achieve the best effect, it is better to use a construction vibrator.

After pouring, such foundations for baths should dry for at least three weeks. This period is necessary in order for the product to gain the necessary strength.
In hot weather, the concrete surface must be periodically moistened with water. This measure will avoid the appearance of cracks on the surface of concrete.
Having decided to make the foundation for the bath, you must first determine the type of future design. The most common types of foundation for a bathhouse are strip and columnar (find out here which is the best foundation for a bathhouse to choose).
The choice of a particular variety depends on the type of soil and building material that will be used to create the bathhouse. You can make the foundation with your own hands. The above recommendations will help you with this.
In addition to studying them, it will be very useful for you to familiarize yourself with the video file posted on this page. The video in this article will provide additional information that will help create the right foundation for the bath.
Do you need a foundation for a bath: types, concrete grade, thickness, correct, optimal, simplest, do-it-yourself video production manual, photo and price
Laying the foundation for the bath
A bathhouse is a light and small structure, so it will not be difficult to make a foundation for it with your own hands. It is only necessary to take into account the features of the functioning of the structure - high humidity inside, large temperature differences.
Due to the low requirements for bearing capacity and stiffness of the support, the foundation for the bath can be built in almost any design:
The first option is well suited for soils with low density and low bearing capacity. An additional plus is that you do not need to think about a separate support for the furnace or boiler.
However, this type is characterized by a large consumption of materials. It is also worth keeping in mind that you will have to create high-quality thermal insulation between the stove and the steam room, because such an impressive amount of concrete will warm up for a long time.
The strip foundation is also quite simple to lay, it will require less concrete, but more wood for formwork. It also requires high-quality thermal insulation.

Columnar is somewhat more difficult to erect, but provides a reliable and stable base for the bath with minimal material consumption.
If the soil is mobile, if it is not possible to make an accurate calculation of the load, then you can create a column-grillage, which will work well even with distortions and movements of the soil.
Pile based on screw supports - the easiest, cheapest, quickly erected.An important advantage is the ability to bookmark even on steep slopes without prior alignment. But its service life is less.
Tile and strip base
The slab foundation under the bathhouse with your own hands is done quite simply.
- First, you need to clear the site, level it, remove the upper fertile soil layer.
- Since the stove covers the entire space under the building, engineering communications should be laid in advance: to bring sewage, water, electricity (the latter is not necessary, because the wiring can also be connected "by air").
- Sand is poured at the bottom of the pit, which levels the area, and also performs a compensating function when the soil is heaving. It should be tamped.

A wooden formwork is installed around the perimeter.
How to fill the foundation of the tape type:
To lay communications before building the foundation itself, in this case there is no need. This can be done later, undermining under a concrete tape. If a shallow tape is made, then immediately it is necessary to create support for the furnace, to make a single foundation.
This is necessary so that in case of soil movements the furnace or boiler moves with the bathhouse.

Pillars and grillage
The column foundation is one of the least material intensive. In any case - from concrete structures. However, this applies only to the support without concrete strapping. This design is suitable for light wooden baths, which are less afraid of distortions, displacements of poles.
For a stone or brick bath, you will need to create a grillage, which significantly increases the consumption of materials.
Such an inexpensive foundation for a bath with your own hands can be done quite simply and quickly.
- First, the area is cleaned and leveled. It is desirable, but not necessary to remove the fertile layer of soil.
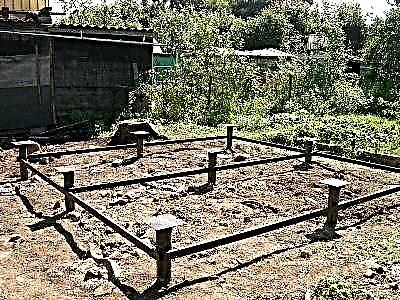
It is important to mark up correctly. The supports should be located at the corners of the building, at the joints of the walls and under the longest spans.
You can immediately lay the supports for the furnace.
If it is necessary to make concrete piping, then after the concrete has hardened, a new formwork is mounted, a reinforcing belt is laid, which is tied with metal in the columns, after which filling is performed. It is best to make an increased grillage, since it is least affected by soil heaving.
Screw piles
This is the fastest and cheapest option, but it is rarely installed with your own hands, because in most cases screw supports are sold by companies that provide installation services.
Nevertheless, if you wish, you can purchase supports and perform styling yourself. One has only to be prepared that 2-3 people will need help.

How to make a foundation for a bath from piles:
- The site is cleaned up, there is no need to level and remove the sod.
- Markup is being done. The bearing capacity of one support is small, so they are usually installed under the entire area of the building.
- A small hole is made in the place of placement of the pile - a guide.
- The support is mounted and screwed in neatly. It is important to ensure that the pile becomes vertically, evenly.
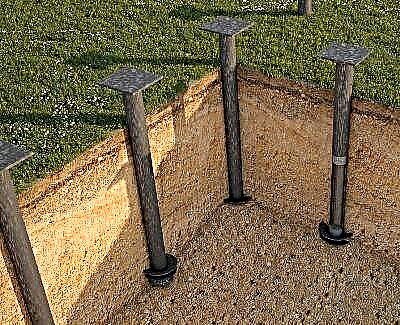
When all supports are screwed in, they are trimmed at the same level.
If the building is massive, then you can perform the bandaging of the supports with metal - channel, beam. If the bath is very light - wooden, then instead of steel, you can use a wooden beam.
Tip. To ensure that the space under the bathhouse is not exposed to the damaging effects of high humidity, several holes should be provided for finishing the basement - ventilation ducts - on each side of the building.
We create the foundation for the bathhouse: the difference in the slab and strip, the fundamentals of the construction of the column and screw bases for the construction of saunas and steam rooms.
Bathhouse: where to start?

The bath is put on a foundation
Of course, from the skeleton of the whole structure. The foundation for the bath needs special attention, because during the operation of the building all the loads fall on it. The walls can be made of blocks, bricks, wood. Frame structures are also being erected (on a strip foundation). The type of foundation depends on how actively the bath will be operated, as well as on the size of the structure. It can be tape, tiled, columnar, pile.
Due to the high cost, the pile and tile skeleton is not popular with developers, but the strip foundation for the bath can be erected independently, however, as well as the columnar one. When choosing the type of base, it is necessary to take into account the necessary properties of the soil: its shrinkage, swelling (freezing), bearing capacity, etc.
Deal with the location of the bathhouse on the site, its number of storeys, the number of rooms. Determine how the building will be heated, where the entrance will be located. Provide for the prospect of building a pool or access to a natural reservoir. Provide drainage. So that rainwater does not undermine the foundation, the construction site should have a slight slope. When heating the bath with wood, determine the place under the woodpile.
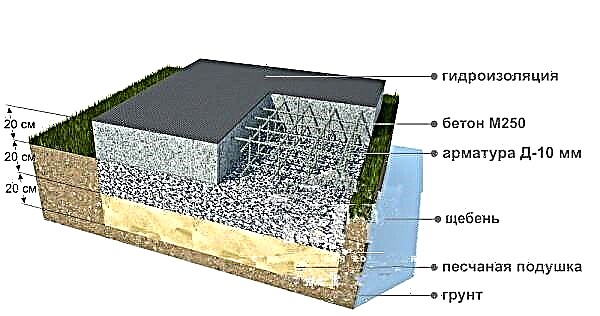
Attention! From the correct calculation of the depth of the foundation of envy the strength of the design of the bath. This will prevent distortion of the walls and roof during operation. In the ideal case, you need to build a bathhouse on a homogeneous, dense soil.
After solving all the issues are determined with the dimensions. Usually, a foundation for a 4x6 bath is built. Although other dimensions are selected. After that, the design of the desired configuration is projected onto paper. Having a visual drawing in front of you with all sizes, you can proceed with the construction of a tape or column base.
Tape base: what is it for?
Reinforced concrete continuous tape has several advantages. On it, you can mount almost any type of wall. Easy to erect. No special earthmoving equipment is required. Economical. The order of work is based on a rational algorithm.

Attention! For the calculation of consumables, there are ready-made reference tables. In addition to the main components, from them you can find out the amount of waterproofing needed, etc. So, according to the reference data, the foundation for a 6x6 bath requires the installation of a concrete strip 32 m long.
Pillars as a base under the bath
Another common option is the columnar foundation for the bath. It is suitable for clay soils and for soils characterized by a low level of groundwater. It is best to erect walls on it from timber or logs.

The pillar foundation is considered the most economical of all foundations and the most pre-fabricated. It can also be built independently. This will require:
Before you make the foundation for the bath, you need to prepare the necessary tools and equipment, calculate the material costs. If there are no construction skills, then it is better to entrust this business to professionals.


The foundation for a bath with your own hands is a logical cost savings. The foundation for the bathhouse, is built according to certain rules.